This feature is only available in Apptrove SDK v2.0.2+. Trackier SDK does not support direct FCM token methods. For Trackier SDK, use the Firebase Analytics method.
Uninstall Tracking through Firebase Cloud Messaging
Firebase Cloud Messaging (FCM) uninstall tracking detects app uninstalls by monitoring FCM delivery receipts. This method is ideal for Expo apps that already use push notifications.
How FCM Uninstall Tracking Works
- Purpose: Tracks app uninstalls using FCM delivery receipts to assess user engagement and campaign performance
- Mechanism: Uses FCM to send silent push notifications and monitors delivery receipts for failed deliveries
- Detection: Uninstall data typically appears in the panel within 24-48 hours
- Use Case: Measure uninstall rates for campaigns to refine targeting and improve user retention
For Firebase Analytics-based uninstall tracking (works with both Apptrove and Trackier SDKs), see Through Firebase Analytics.
Prerequisites
Before implementing FCM uninstall tracking, ensure you have:
- Firebase project with Cloud Messaging enabled
- Expo app with EAS Build configured
- Apptrove SDK v2.0.2+ properly initialized
- expo-notifications package installed
- Android platform (FCM uninstall tracking is Android-only)
Implementation
1. Add Dependencies
Add Firebase and notifications packages to your project:
npx expo install expo-notifications
package.json:
{
  "dependencies": {
    "expo-notifications": "~0.28.0",
    "apptrove-expo-sdk": "^2.0.2"
  }
}
Check the Expo Notifications documentation for the latest version and setup instructions.
2. Configure Firebase
Android Configuration
app.json:
{
  "expo": {
    "android": {
      "package": "com.yourcompany.yourapp",
      "googleServicesFile": "./google-services.json"
    },
    "plugins": [
      [
        "expo-notifications",
        {
          "sounds": []
        }
      ]
    ]
  }
}
Download google-services.json from Firebase Console and place it in your project root directory.
3. Initialize FCM
Create the FCM initialization function in your App.tsx or App.js:
FCM tokens are generated only once when the app is first installed or when Firebase generates a new token. If you run the app once and don't see the token in logs, you won't see it again on subsequent runs. To see the token again, you need to:
- Uninstall the app completely
- Reinstall the app
- Check logs immediately for the token
This is normal FCM behavior - tokens are not generated on every app launch, only when:
- App is first installed
- Firebase generates a new token (rare)
- App data is cleared
- App is restored on a new device
import React, { useEffect } from 'react';
import { Platform } from 'react-native';
import * as Notifications from 'expo-notifications';
import { AppTroveConfig, AppTroveSDK } from 'apptrove-expo-sdk';

export default function App() {
  useEffect(() => {
    initializeSDK();
  }, []);

  const initializeSDK = async () => {
    try {
      // Initialize AppTrove SDK
      const config = new AppTroveConfig(
        'YOUR_SDK_KEY',
        AppTroveConfig.EnvironmentDevelopment
      );
      AppTroveSDK.initialize(config);

      // Register push notifications for Android
      if (Platform.OS === 'android') {
        await registerPushNotifications();
      }
    } catch (error) {
      console.error('Error initializing SDK:', error);
    }
  };

  const registerPushNotifications = async () => {
    try {
      console.log('[FCM] Requesting push notification permissions...');

      // Request permissions
      const { status: existingStatus } = await Notifications.getPermissionsAsync();
      let finalStatus = existingStatus;

      if (existingStatus !== 'granted') {
        const { status } = await Notifications.requestPermissionsAsync();
        finalStatus = status;
      }

      if (finalStatus !== 'granted') {
        console.warn('[FCM] Push notification permission denied');
        return;
      }

      console.log('[FCM] Permission granted');

      // Get the device push token (FCM token for Android)
      const deviceToken = await Notifications.getDevicePushTokenAsync();
      const fcmToken = deviceToken.data;

      console.log('[FCM] Token retrieved:', fcmToken);

      // Send FCM token to AppTrove SDK
      AppTroveSDK.sendFcmToken(fcmToken);
      console.log('[FCM] Token sent to AppTrove SDK successfully');
    } catch (error) {
      console.error('[FCM] Error registering push notifications:', error);
    }
  };

  return (
    // Your app components
  );
}
- Token Generation: FCM tokens are generated when the app is first installed or when the token is refreshed
- Token Refresh: Tokens can change when: app is restored on a new device, app data is cleared, app is uninstalled and reinstalled, or token expires (rare)
- One-Time Call: The token is retrieved once during app initialization
- SDK Integration: Call
AppTroveSDK.sendFcmToken(fcmToken)when the token is generated
4. Firebase Console Configuration
Step 1: Connect Product to Firebase
If you haven't already connected your product to Firebase:
- Go to the Firebase Console
- Create a new project or select an existing one
- Add your Android app to the project
- After setting up the project on console, go to Settings
- In the General tab, see the Project ID and copy it

Step 2: Configure in Apptrove Panel
- Go to your Apptrove panel
- Navigate to Settings page
- Go to Uninstall Tracking tab
- Paste the Project ID you copied from Firebase Console
- Enable the toggle for uninstall tracking

Step 3: Enable Cloud Messaging API
- Go to the Cloud Messaging tab
- Check if Firebase Cloud Messaging API (V1) is enabled

If not enabled:
- Go to Service accounts tab

- Go to Library
- Search for Firebase Cloud Messaging API
- Click Enable

Step 4: Create Custom Role for Apptrove
- In the side menu, select Roles
- Click +Create role

- Complete the form as follows:
- Title: Enter
Apptrove Uninstall - ID: Enter
at_uninstalls - Role launch stage: Select
General availability
- Title: Enter
- Click Add permissions

- In the Filter field, search for:
cloudmessaging.messages.create - Select the permission and click Add
- Click Create
After creating the role, check and verify that the Apptrove Uninstall role has been added successfully with the cloudmessaging.messages.create permission.

Step 5: Assign Apptrove the FCM Uninstall Role
- In the side menu, select IAM
- Click Grant Access

- In Add Principals → New principals, enter:
at-uninstalls-tracking-tra-430@trackier-mmp.iam.gserviceaccount.com - In Assign roles → Role select Custom and choose Apptrove Uninstall (the role we created earlier)
- Click Save
Use this exact email address for production: at-uninstalls-tracking-tra-430@trackier-mmp.iam.gserviceaccount.com

Step 6: Verify Permissions
- Go to IAM & Admin → IAM
- Search for the service account you just added
- Verify that the Apptrove Uninstall role is assigned

If you need to test uninstall tracking in a development environment, you can also add the testing service account:
Testing Service Account: mmp-dev@trackier-mmp.iam.gserviceaccount.com
Repeat Step 5 with this email address and assign the same Apptrove Uninstall custom role. This allows the development team to test the uninstall tracking flow without affecting production data.
Verification and Testing
1. Test FCM Token Registration
When your app starts, check the logs to verify the FCM token is being sent to Apptrove:
npx expo run:android
Check the console logs for:
[FCM] Requesting push notification permissions...
[FCM] Permission granted
[FCM] Token retrieved: [YOUR_FCM_TOKEN]
[FCM] Token sent to AppTrove SDK successfully
Check Token Response in Logcat: In Android Studio Logcat, filter by apptrove or trackier to see SDK-specific logs. Look for the log message Fcm token Api response saved successfully.
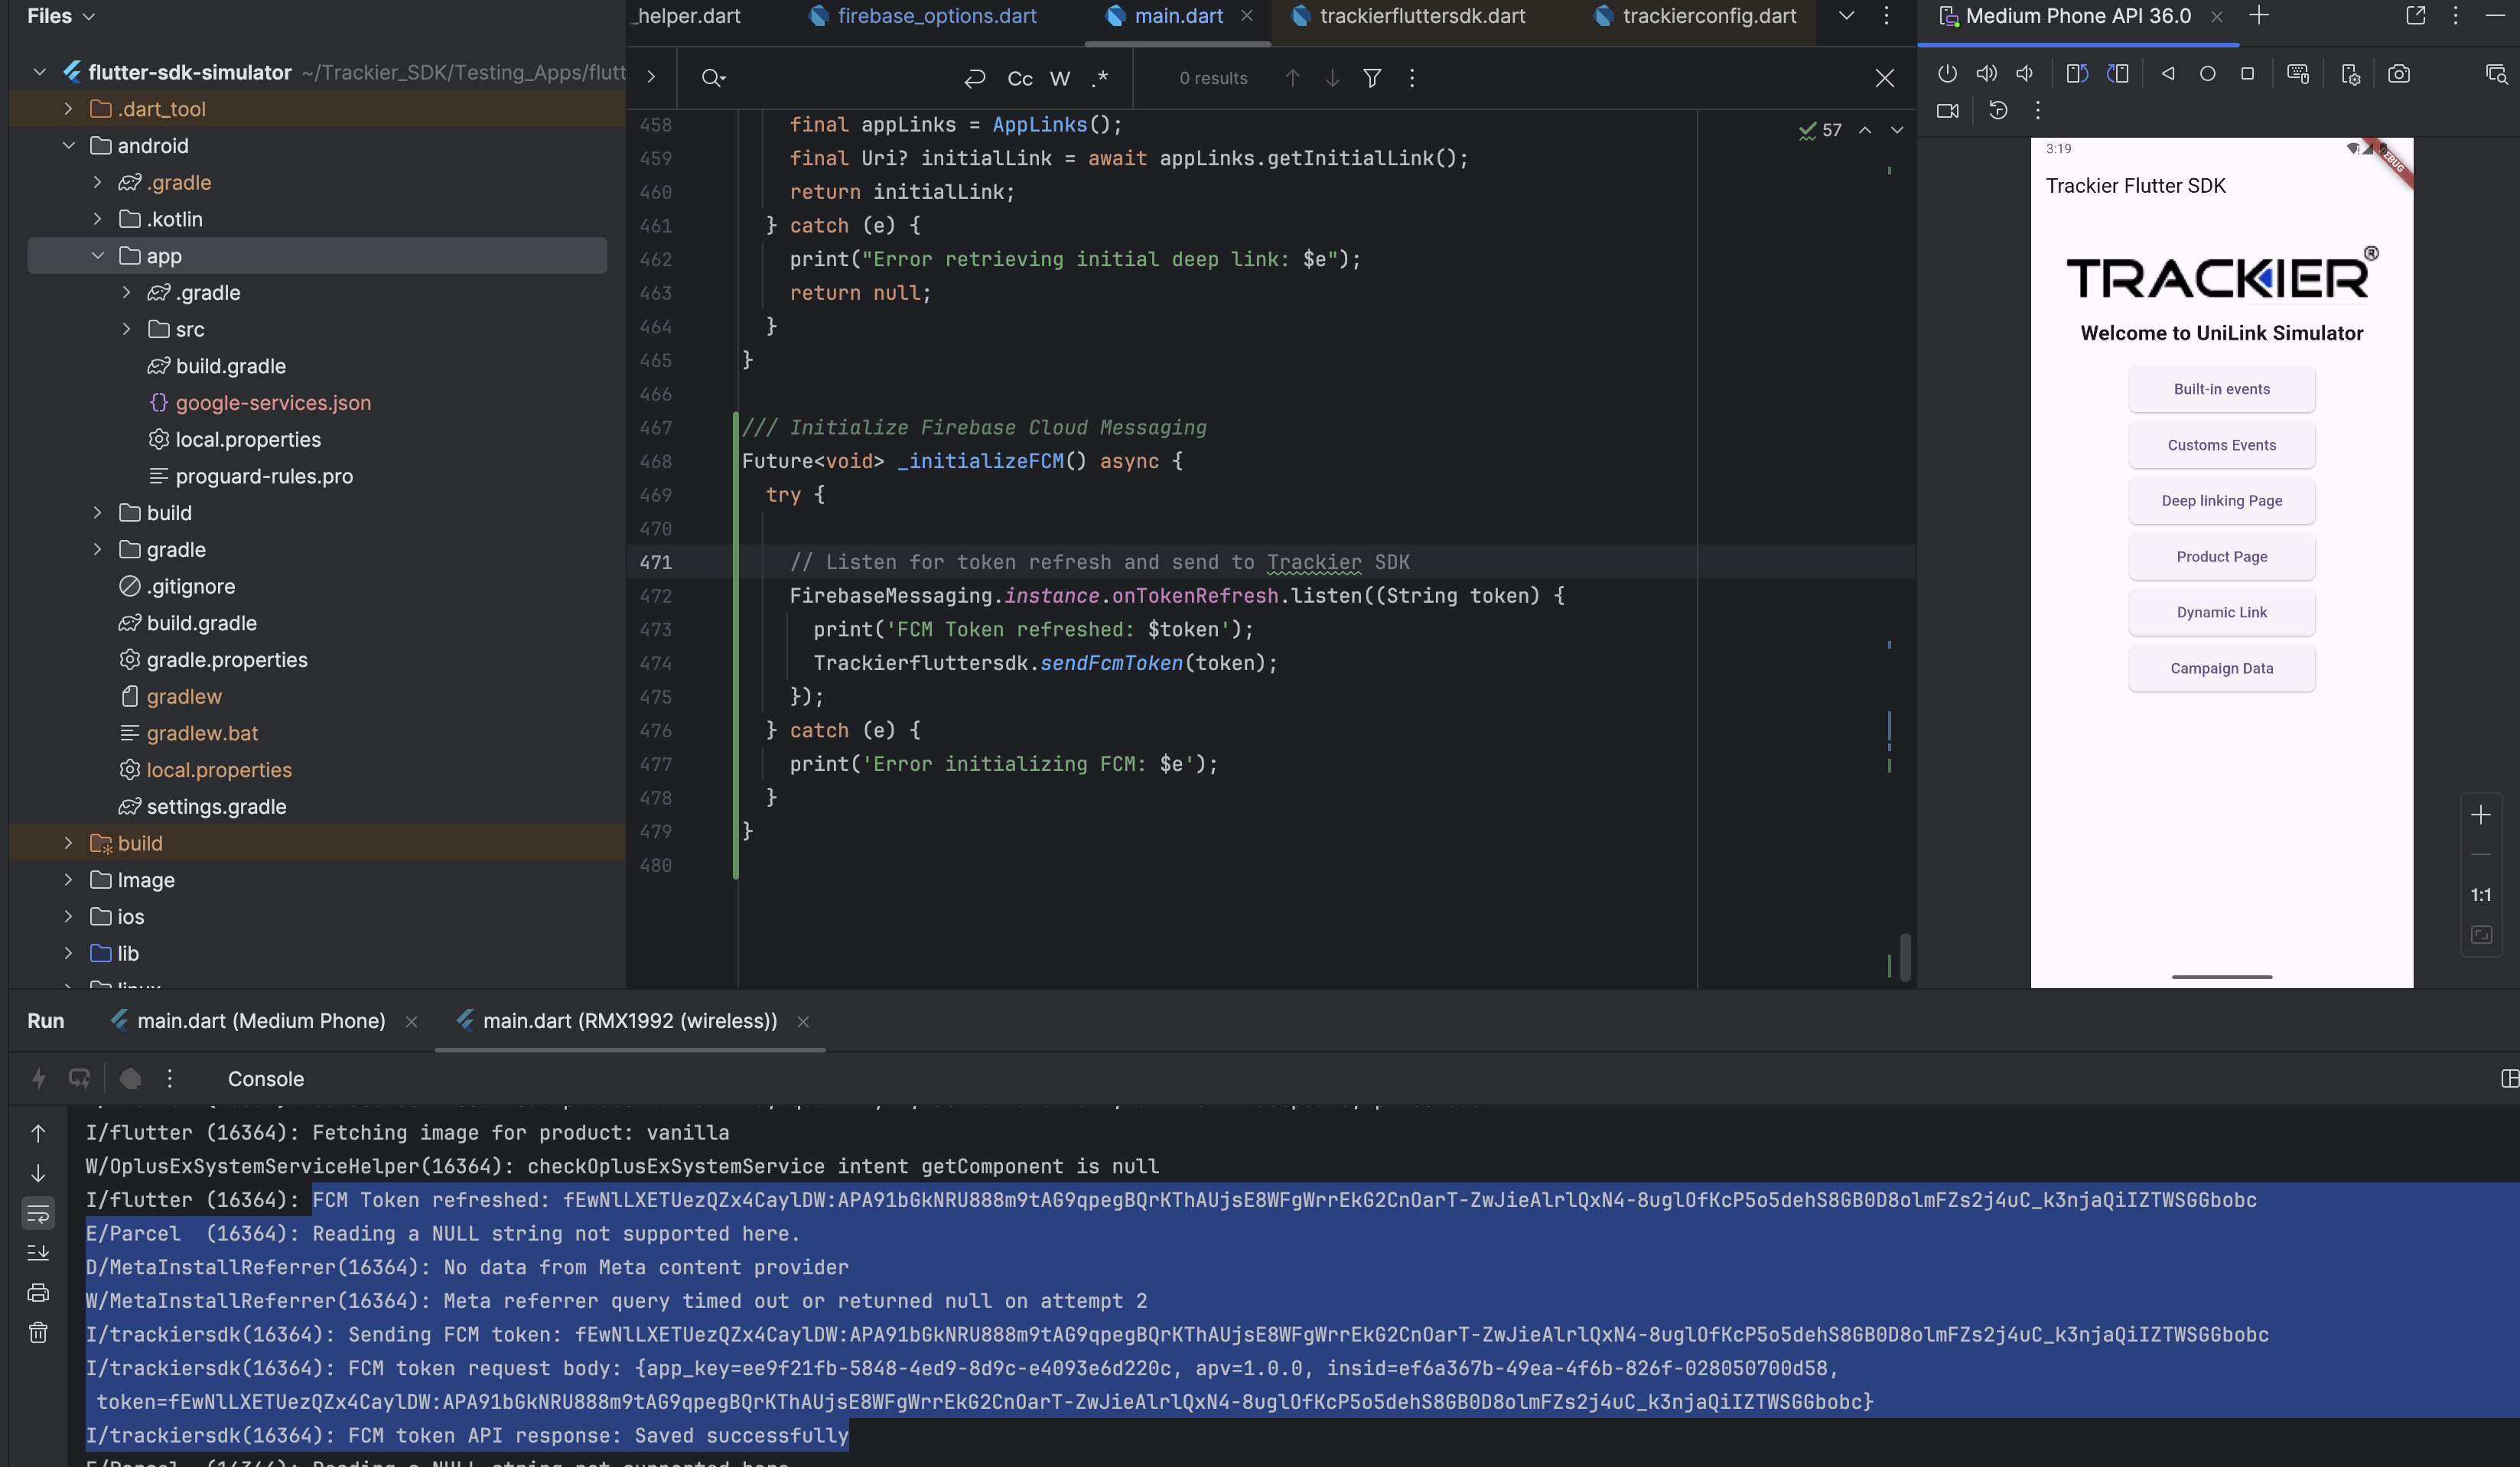
Expected Log Output:
D/apptrove: Fcm token Api response saved successfully
Method 1: Send Token via Custom Event Parameter (Optional Testing)
Add this code to capture and send the token for testing purposes:
import { AppTroveSDK, AppTroveEvent } from 'apptrove-expo-sdk';

// After getting FCM token
const sendTokenForTesting = async (fcmToken) => {
  // Send to AppTrove SDK
  AppTroveSDK.sendFcmToken(fcmToken);

  // TESTING ONLY: Send token via custom event parameter
  const testEvent = new AppTroveEvent("fcm_token_test");
  testEvent.param1 = fcmToken;  // Send token in param1
  AppTroveSDK.trackEvent(testEvent);
};
Sending the FCM token via a custom event parameter allows you to:
- Verify the token is being generated correctly
- See the token value in your dashboard for debugging
- Confirm the SDK is properly initialized and tracking events
2. Verify Setup in Dashboard
After successfully sending the FCM token, verify the complete setup in your Apptrove dashboard:
- Go to Apptrove Panel > Settings > Uninstall Tracking
- Verify your Firebase Project ID is correctly configured
- Check that the toggle for uninstall tracking is enabled
- Confirm the service account has proper permissions in Firebase Console (IAM section)
- (Optional) If using Method 1, check Events or Logs for the
fcm_token_testevent to verify the token value
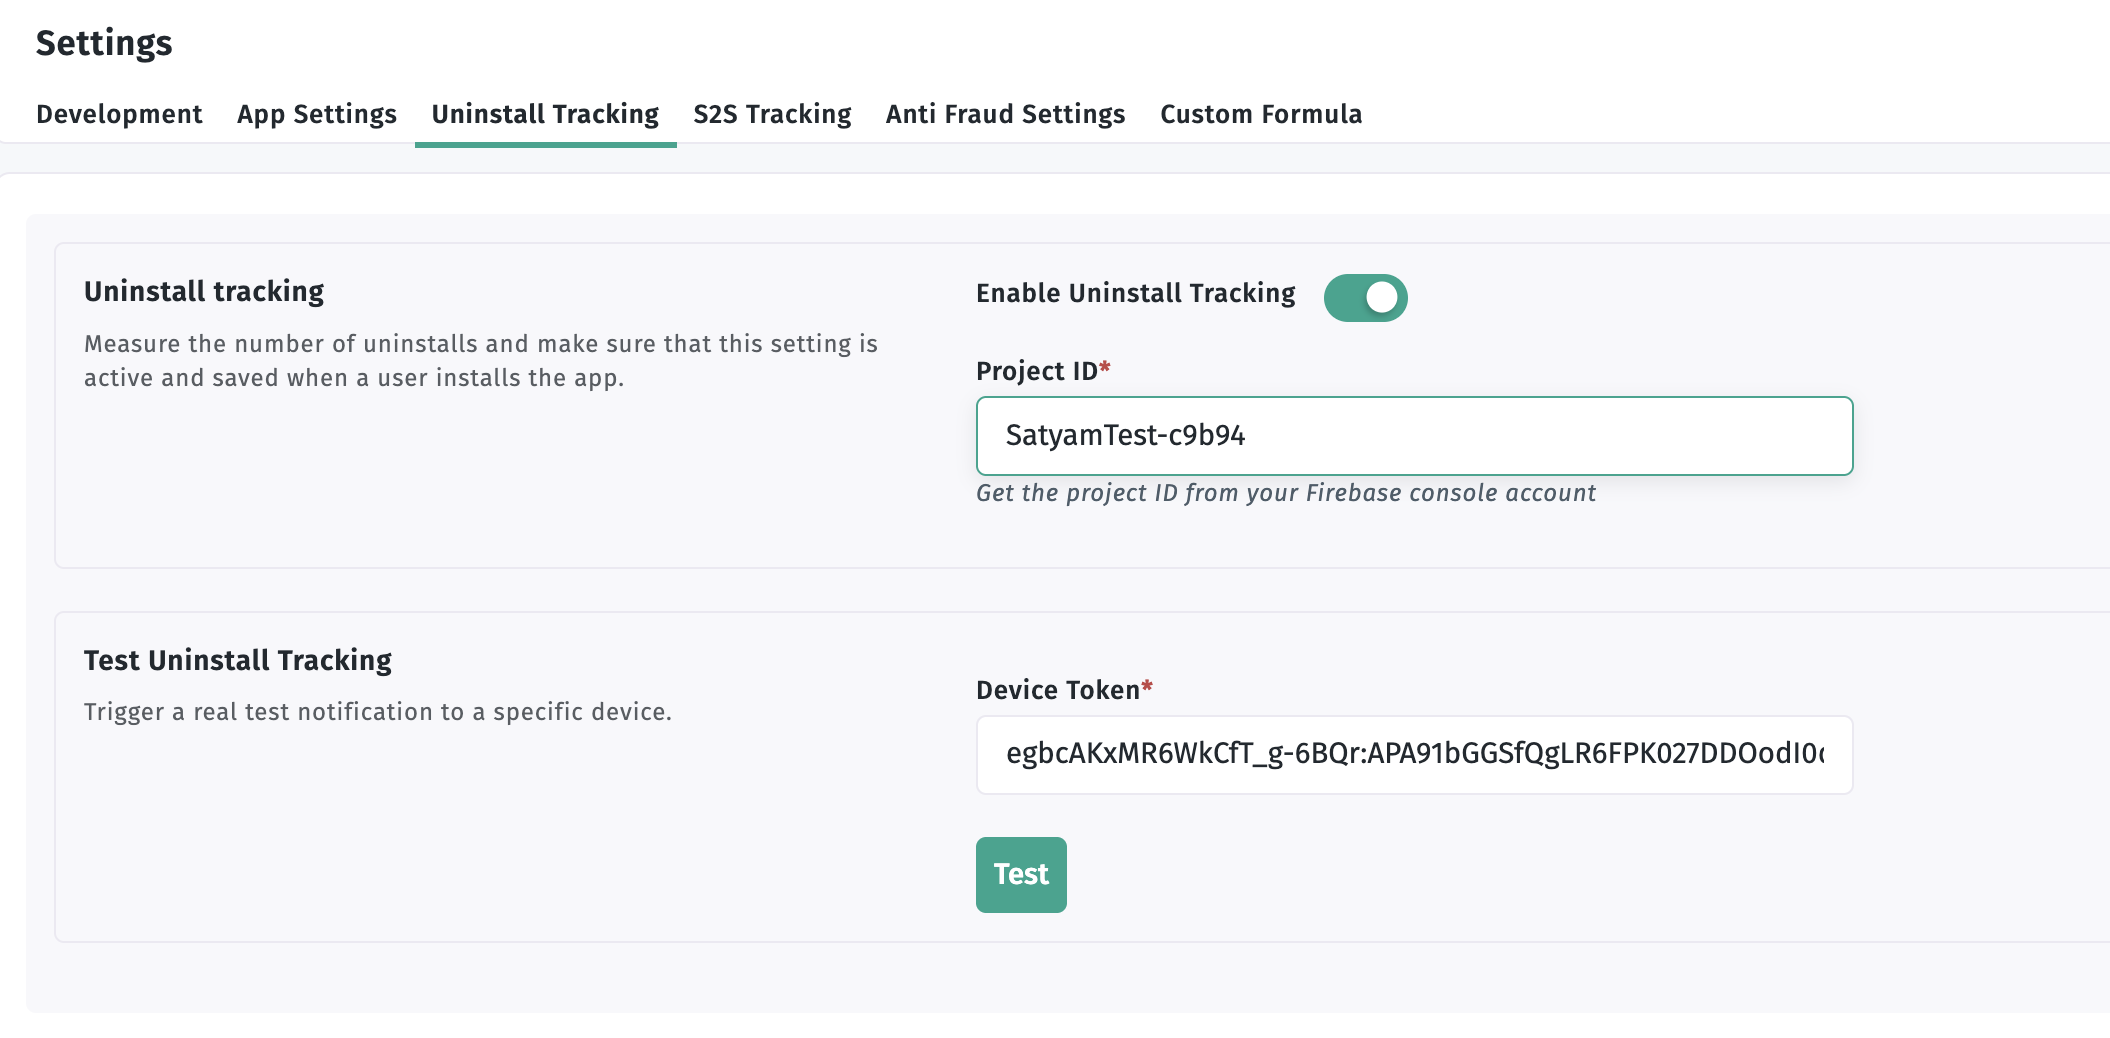
The image above shows a successful uninstall tracking setup with:
- ✅ Firebase Project ID configured
- ✅ Uninstall tracking toggle enabled
- ✅ Service account permissions verified
- ✅ FCM API enabled
3. Test Uninstall Detection
- Install your app and register FCM token
- Verify token is sent (check logs for "Token sent to AppTrove SDK successfully" and logcat for "Fcm token Api response saved successfully")
- Uninstall the app
- Wait 24-48 hours for the uninstall data to be processed
- Check Apptrove dashboard for uninstall event
4. Monitor Apptrove Dashboard
- Log in to your Apptrove dashboard
- Navigate to uninstall logs
- Confirm the uninstall event was received (typically within 24-48 hours)
Uninstall events are not detected immediately. It typically takes 24-48 hours for uninstall data to appear in the Apptrove panel after an app is uninstalled. This is normal behavior for FCM-based uninstall tracking.
Important Notes
- Token Generation: FCM tokens are generated when the app is first installed or when the token is refreshed
- Token Refresh: Tokens can change when: app is restored on a new device, app data is cleared, app is uninstalled and reinstalled, or token expires (rare)
- One-Time Call: Token retrieval happens once during app initialization
- SDK Integration: Call
AppTroveSDK.sendFcmToken(fcmToken)when the token is generated
Apptrove uses silent push notifications solely to measure uninstalls or identify inactive users and does not use them for any other purposes. These notifications are invisible to users and don't affect app performance.
Troubleshooting
Common Issues
- FCM token not received: Ensure Firebase is properly configured with
google-services.jsonin your project root andexpo-notificationspackage is installed - Uninstall not detected: Check server logs for FCM delivery failures and verify token registration
- Token not sent to SDK: Ensure
registerPushNotifications()is called after SDK initialization - Rate limiting: Implement proper delays between FCM sends to avoid Google's rate limits
- Token expiration: Tokens are automatically refreshed by Firebase
- Permission denied: Verify push notification permission is granted
- Expo Go limitations: FCM tokens require a development or production build (not Expo Go)
- Token not visible in logs: FCM tokens are generated only once on first install. To see the token again, uninstall and reinstall the app
Best Practices
- Silent notifications: Use silent push notifications to avoid user disruption
- Rate limiting: Implement proper delays to avoid FCM rate limits
- Token management: Handle FCM token refresh and updates properly
- Error handling: Implement comprehensive error handling for FCM failures
- Security: Store FCM tokens securely on your server
- Call Order: Always initialize FCM after Apptrove SDK initialization
- Use EAS Build: Always use EAS Build for testing FCM functionality (not Expo Go)
Debug Steps
-
Verify Firebase Setup:
npx expo run:android -
Check Console Logs:
- Look for
[FCM]prefixed logs in console - Verify token is retrieved and sent successfully
- Look for
-
Check Android Studio Logcat:
- Open Android Studio
- Go to Logcat tab
- Filter by
apptroveortrackier(depending on your SDK) - Look for
Fcm token Api response saved successfully
-
Verify Dependencies: Ensure
expo-notificationsis properly installed:npx expo install expo-notifications -
Check Firebase Console:
- Verify your app is registered in Firebase Console
- Ensure FCM API is enabled
- Confirm
google-services.jsonis in project root
-
Test with EAS Build: Build and test with EAS Build:
eas build --profile development --platform android -
Verify Platform: Ensure you're testing on Android device/emulator, as iOS doesn't support FCM uninstall tracking
-
Test Token Event (Optional): If using Method 1, check your dashboard for the
fcm_token_testevent to verify the token is being captured correctly
SDK Method
sendFcmToken(token)
Send the FCM token to Apptrove for uninstall tracking.
Usage:
AppTroveSDK.sendFcmToken(fcmToken);
Parameters:
fcmToken(string): The FCM device token retrieved fromexpo-notifications
Returns: void
Example:
const deviceToken = await Notifications.getDevicePushTokenAsync();
const fcmToken = deviceToken.data;
AppTroveSDK.sendFcmToken(fcmToken);
For additional help, contact Apptrove support at support@apptrove.com.