iOS Uninstall Tracking (APN)
Overview
Track app uninstalls using Apple Push Notification Service (APNs) to measure user retention and optimize your campaigns.
iOS uninstalls take 9+ days to appear in reports due to Apple Push Notification service.
Prerequisites
- iOS 10.0 or higher
- Xcode 12.0 or later
- Apple Developer Account
- Apptrove React Native SDK version 1.6.x+ installed
- Apptrove SDK (recommended): Use
react-native-apptroveandApptroveSDK.sendAPNToken(apnsToken). - Trackier SDK (deprecating August 2026): Use
react-native-trackierandTrackierSDK.sendAPNToken(apnsToken).
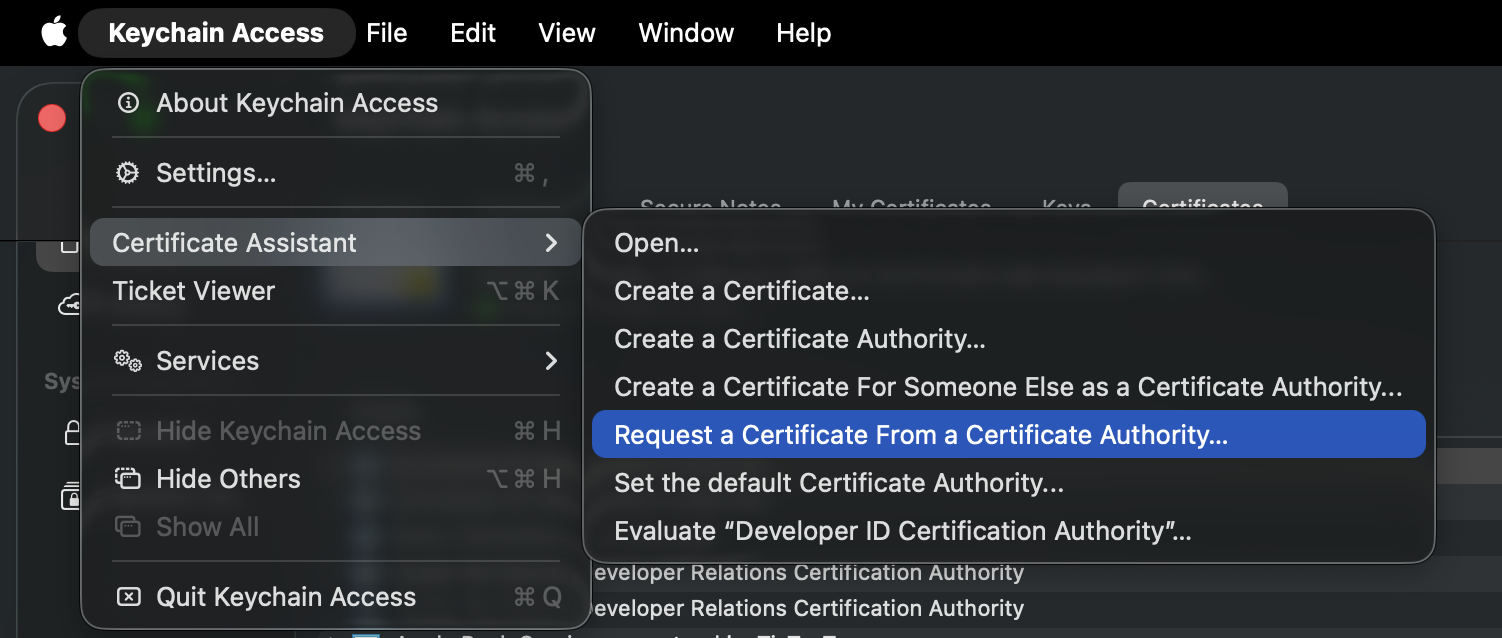
Step 1: Request Certificate in Keychain Access
1.1. Open Keychain Access on your Mac.
1.2. Go to Keychain Access > Certificate Assistant > Request a Certificate From a Certificate Authority.
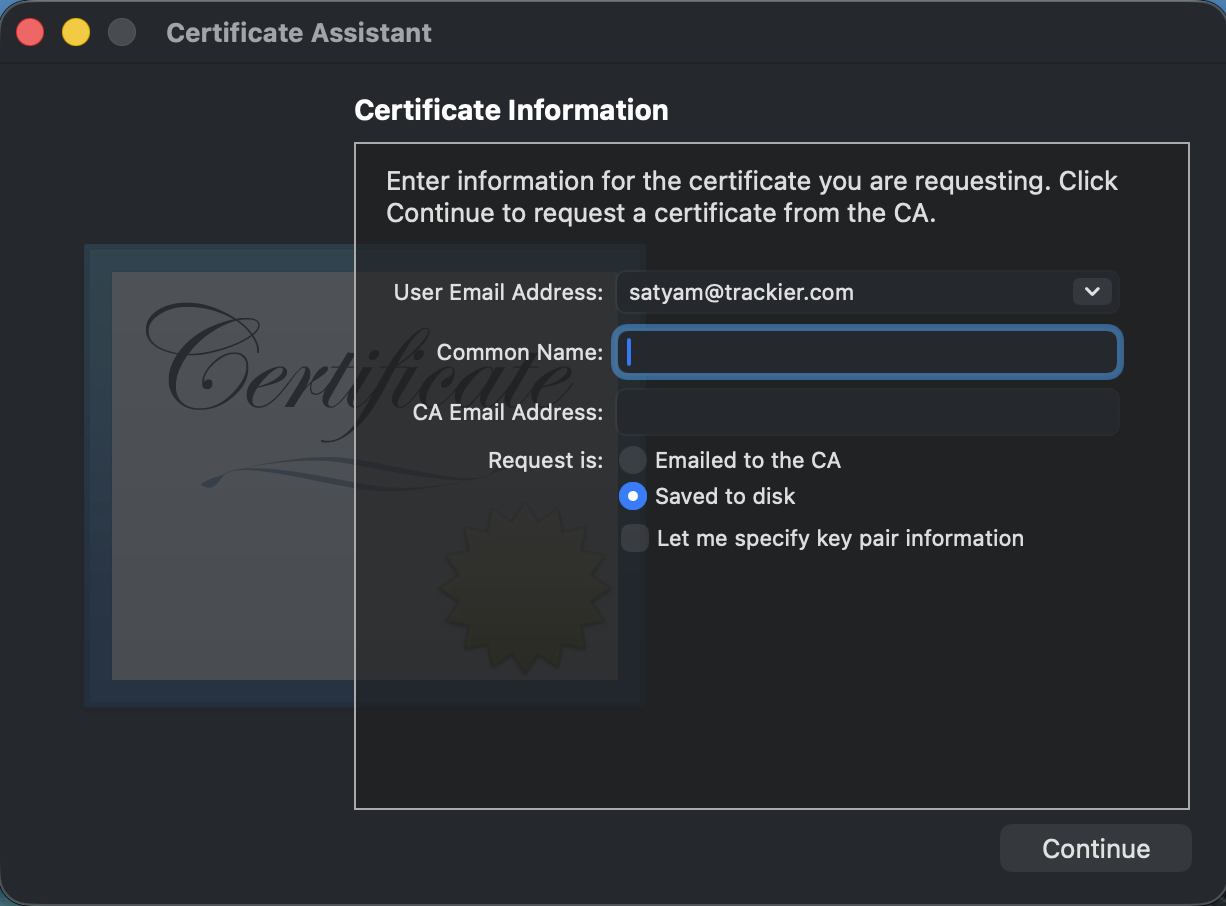
1.3. Fill in the form:
- User Email Address: Your email
- Common Name: Your name
- Request is: Select Saved to disk
- Click Continue
1.4. Save the file to your Desktop.
Step 2: Go to Apple Developer Portal - Identifiers
2.1. Open Apple Developer Portal.
2.2. Go to Certificates, Identifiers & Profiles.
2.3. Click Identifiers.
2.4. Select your App ID (your app's bundle ID/package name).

Step 3: Configure Push Notifications
3.1. After clicking your App ID, you'll see the App ID Configuration page.
3.2. Scroll to Capabilities section.
3.3. Check Push Notifications.
3.4. Click Configure.

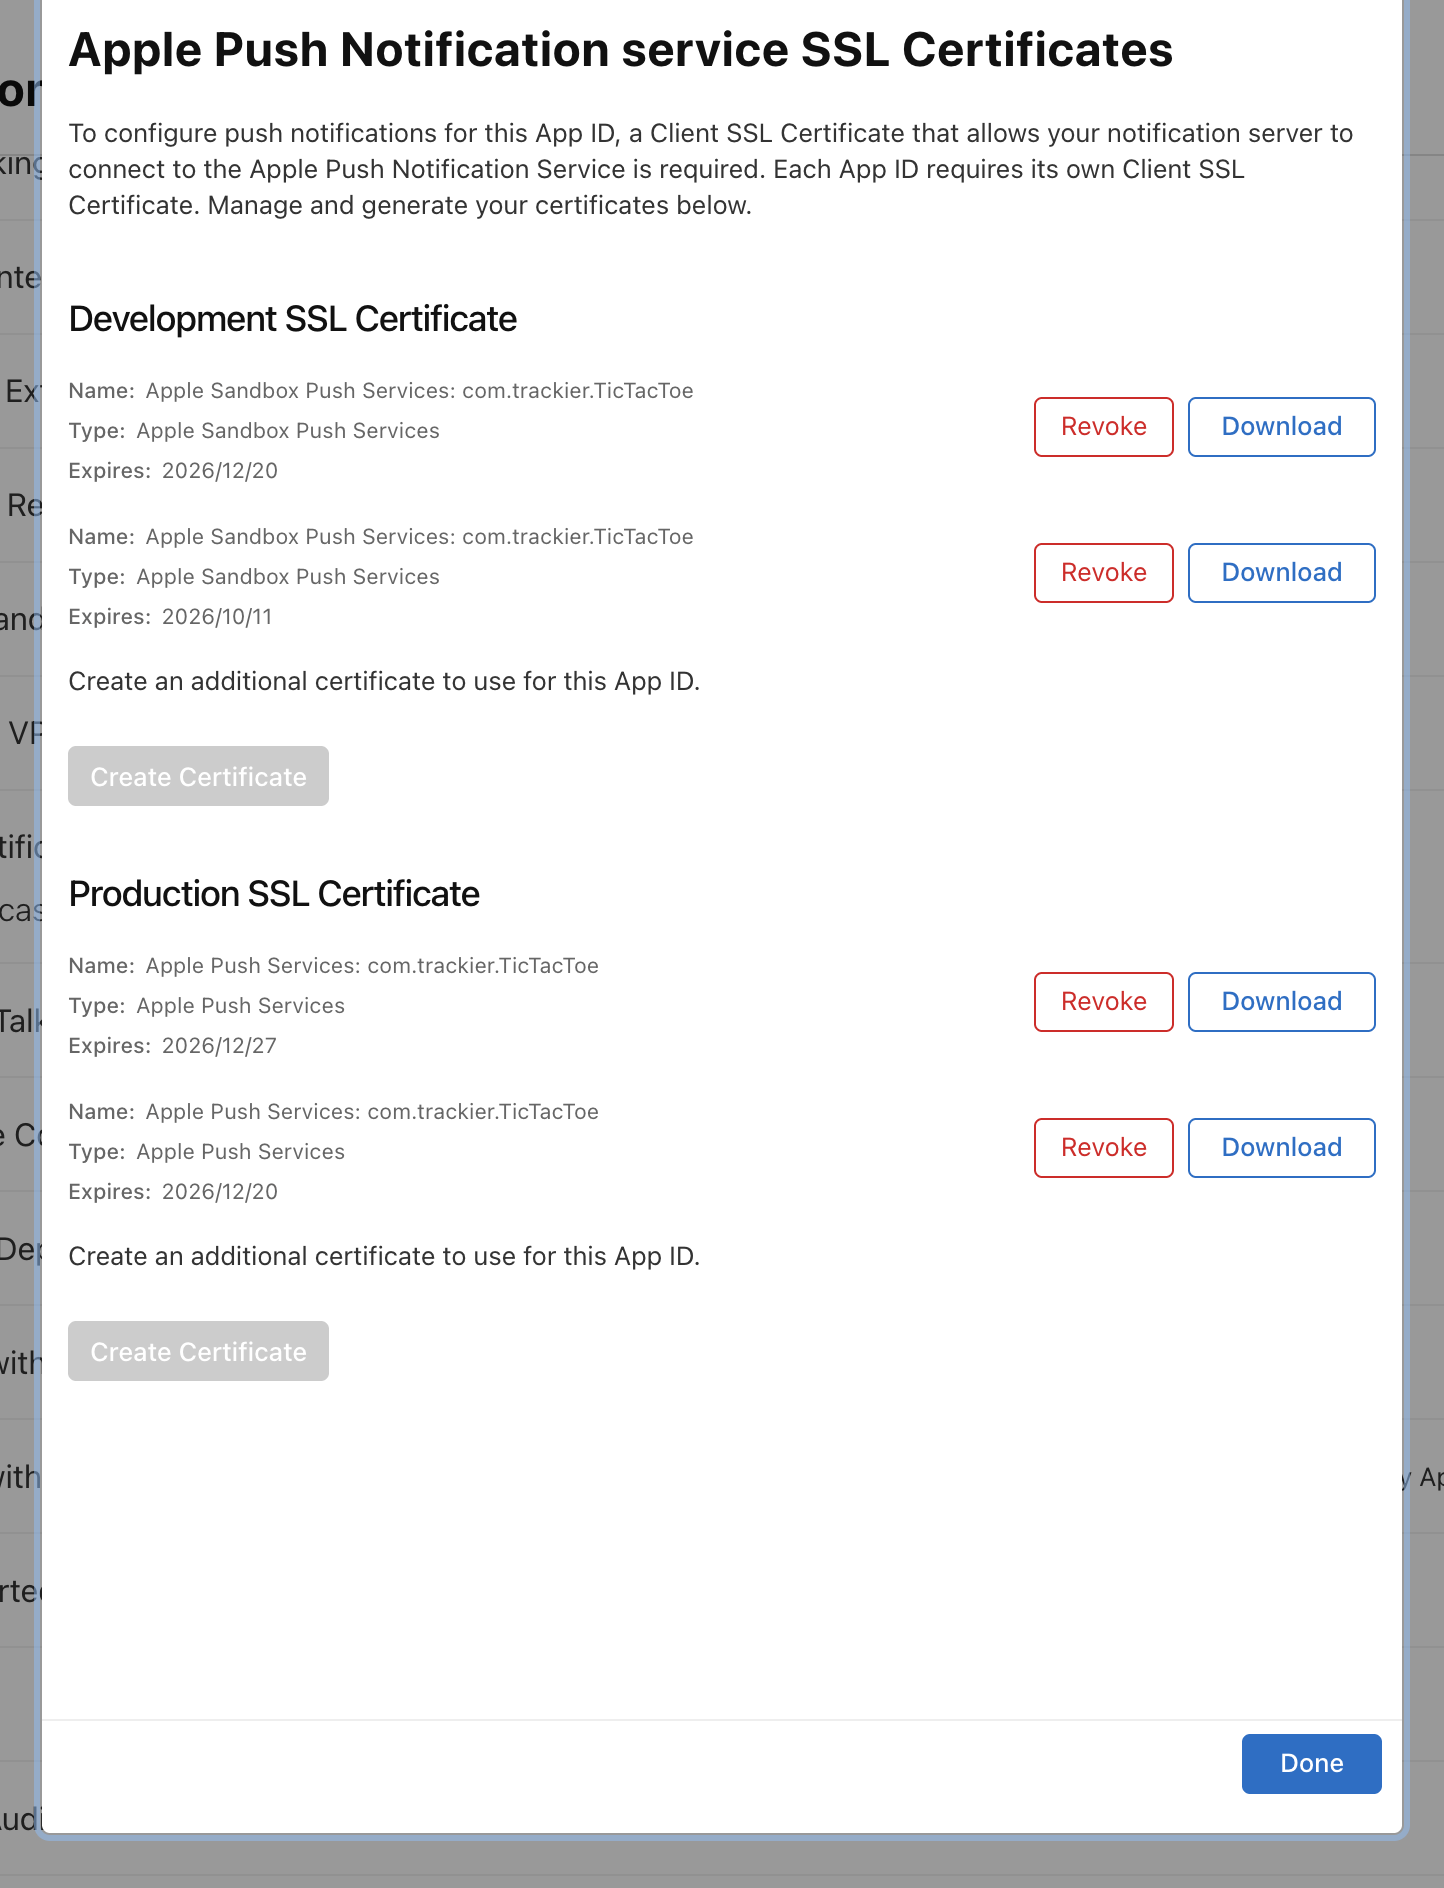
Step 4: Upload Certificate and Download .cer
4.1. In the Push Notifications configuration screen, choose:
- Production SSL Certificate (for App Store/Production)
- Click Create Certificate
4.2. Click Choose File and upload the .certSigningRequest file from Step 1.
4.3. Click Continue.
4.4. Click Download to save the .cer file.
Step 5: Go to Keychain and Export as .p12
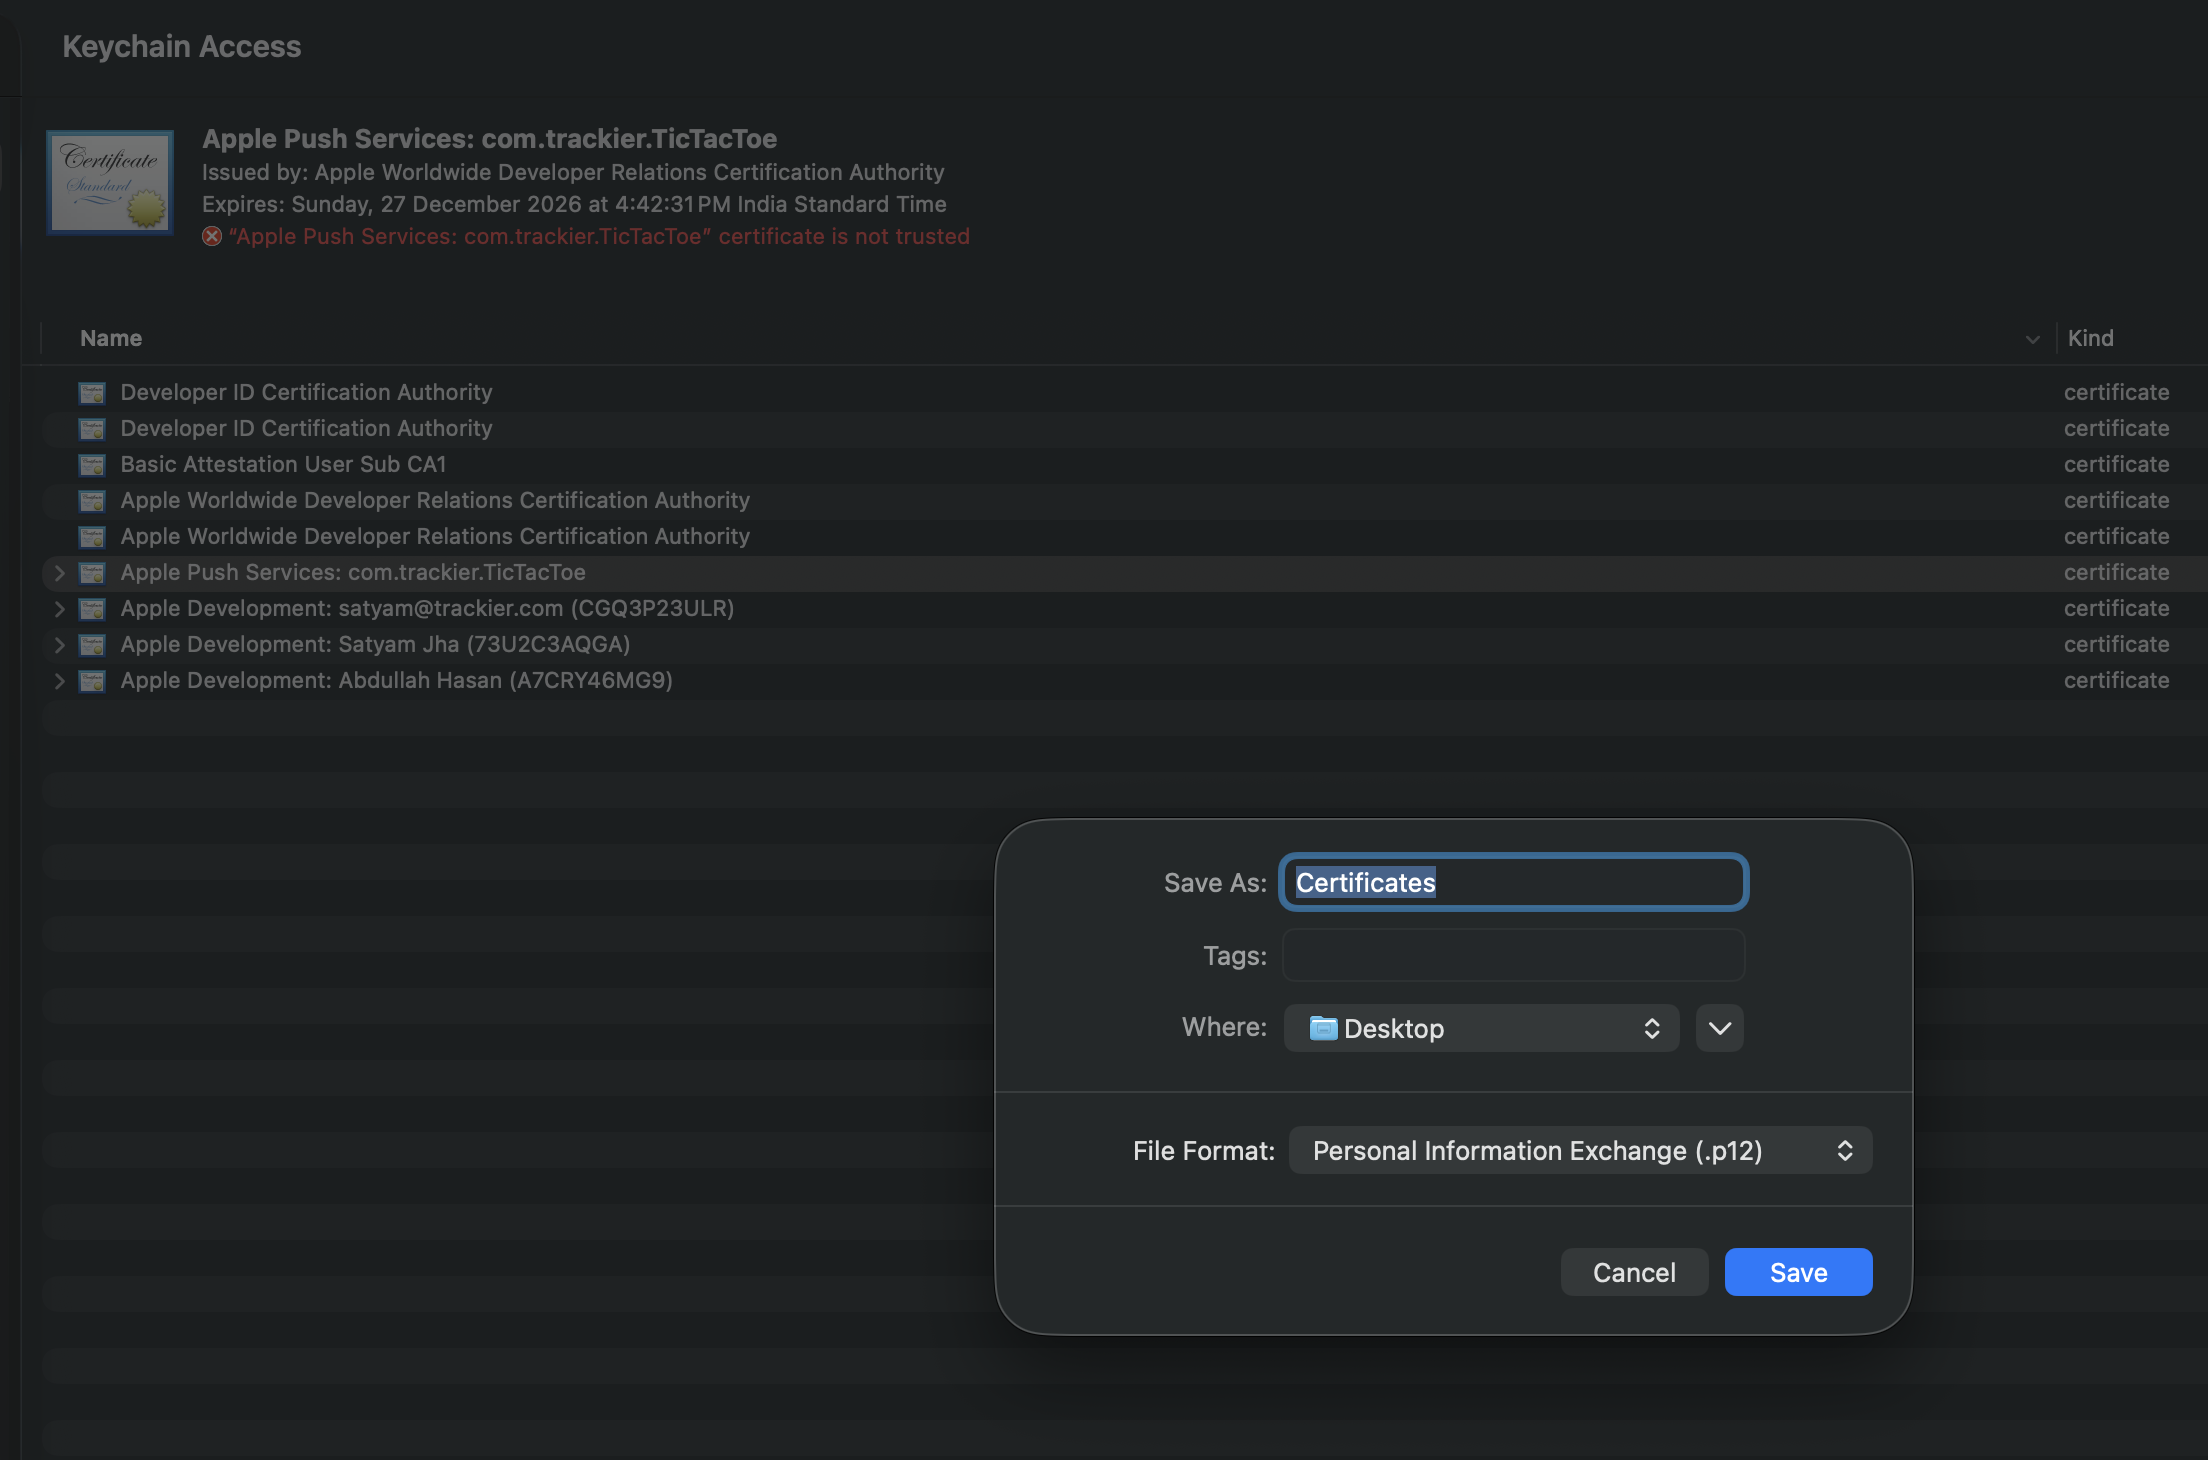
5.1. Double-click the downloaded .cer file to open it in Keychain Access.
5.2. In Keychain Access, click My Certificates in the left sidebar.
5.3. Find your Push Notification certificate (e.g., "Apple Push Services: com.yourapp.package").
5.4. Right-click on the certificate → Select Export.
5.5. Save as:
- File Format: Personal Information Exchange (.p12)
- Enter a password (you will need this later)
- Click Save
Step 6: Upload .p12 to Apptrove Panel
6.1. Log in to your Apptrove Panel.
6.2. Go to Settings > Uninstall Tracking.
6.3. Select your iOS app.
6.4. Click Upload and select the .p12 file.
6.5. Enter the password you created in Step 5.
6.6. Click Save.
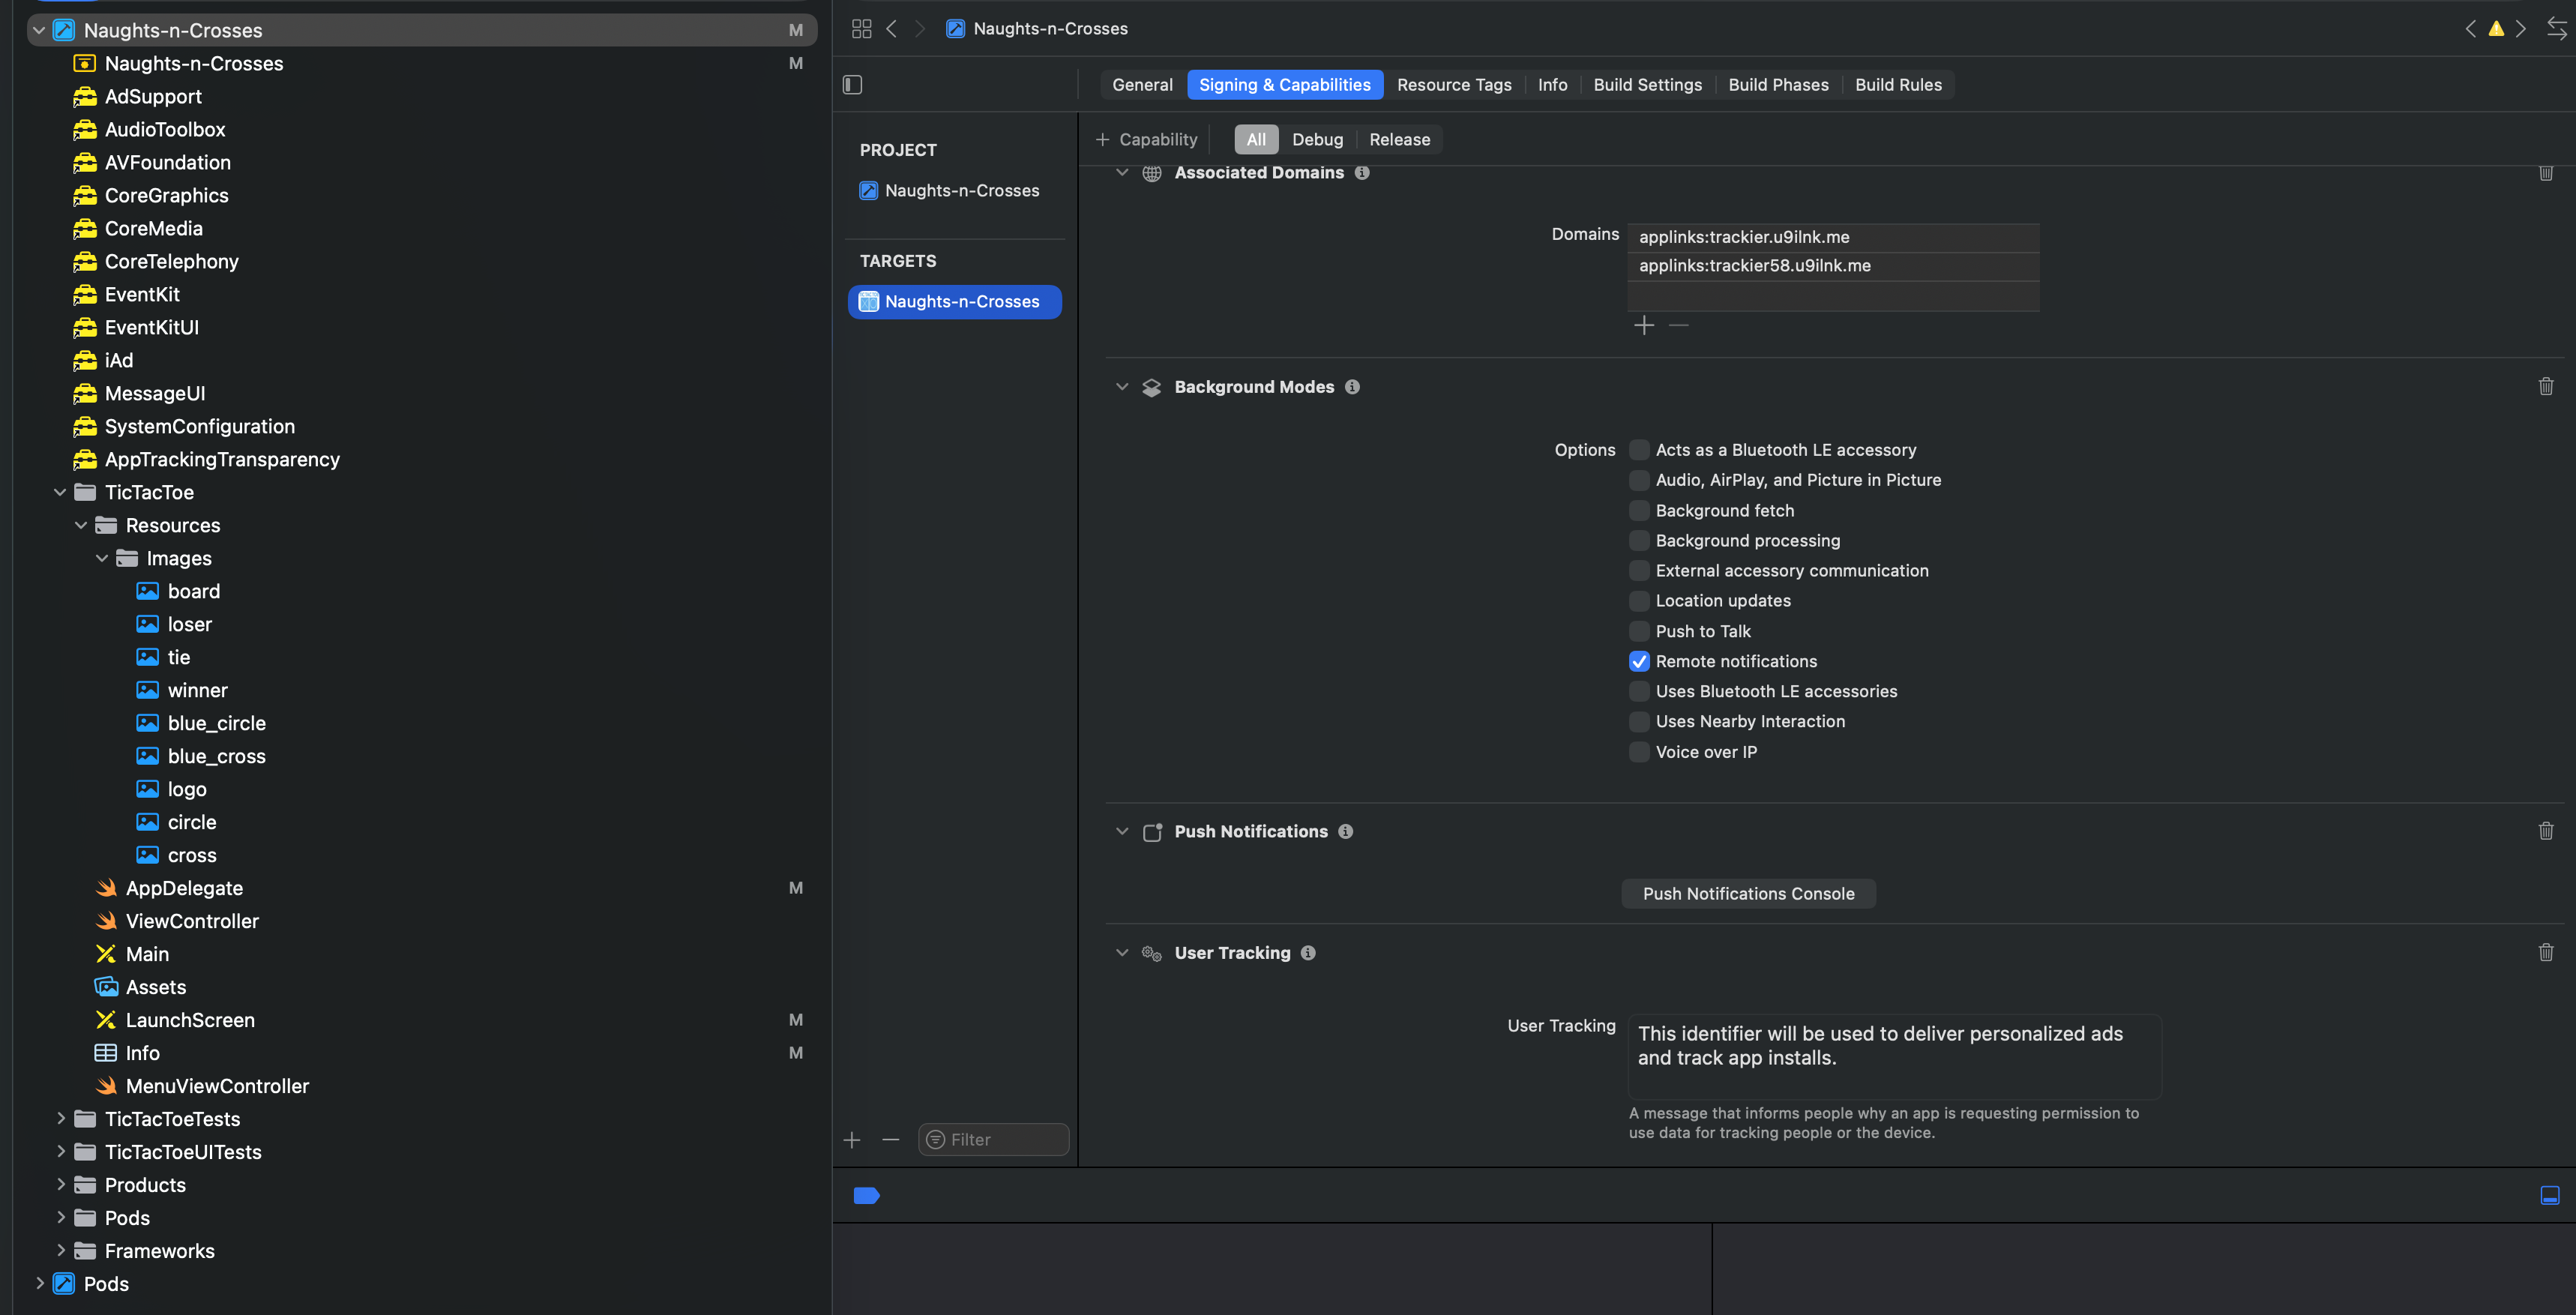
Step 7: Configure in Xcode
7.1. Open your project in Xcode.
7.2. Select your app Target → Signing & Capabilities tab.
7.3. Click + Capability → Add Push Notifications.
7.4. Click + Capability again → Add Background Modes.
7.5. Check Remote notifications.
Step 8: Add User Permission in Info.plist
8.1. Open your project in Xcode.
8.2. Open the Info.plist file.
8.3. Add the following key and description:
Key: NSUserNotificationsUsageDescription
Value: We need permission to send you notifications and track uninstalls.
You can also add it in the Source Code view:
<key>NSUserNotificationsUsageDescription</key>
<string>We need permission to send you notifications and track uninstalls.</string>
This permission message will be shown to users when your app requests notification access.
Step 9: Send Token to Apptrove SDK
9.1 Configure AppDelegate.mm
In your ios/YourProjectName/AppDelegate.mm, initialize Firebase manually to avoid GoogleService-Info.plist dependency if needed:
#import "AppDelegate.h"
#import <FirebaseCore/FirebaseCore.h>

@implementation AppDelegate

- (BOOL)application:(UIApplication *)application didFinishLaunchingWithOptions:(NSDictionary *)launchOptions {

  // Manual Firebase configuration
  FIROptions *options = [[FIROptions alloc] initWithGoogleAppID:@"YOUR_APP_ID" GCMSenderID:@"YOUR_SENDER_ID"];
  options.APIKey = @"YOUR_API_KEY";
  options.projectID = @"YOUR_PROJECT_ID";
  options.storageBucket = @"YOUR_STORAGE_BUCKET";

  [FIRApp configureWithOptions:options];

  self.moduleName = @"YourProjectName";
  self.initialProps = @{};

  return [super application:application didFinishLaunchingWithOptions:launchOptions];
}
9.2 React Native Implementation
Retrieve the APN token using @react-native-firebase/messaging and send it to the Apptrove SDK in your App.js.
- ✓ Apptrove SDK (Recommended)
- Trackier SDK (Deprecating August 2026)
import { Platform } from 'react-native';
import messaging from '@react-native-firebase/messaging';
import { ApptroveSDK } from 'react-native-apptrove';

const initializeAPNS = async () => {
  if (Platform.OS !== 'ios') return;

  try {
    await messaging().registerDeviceForRemoteMessages();
    const authStatus = await messaging().requestPermission();
    const enabled = authStatus === messaging.AuthorizationStatus.AUTHORIZED ||
                    authStatus === messaging.AuthorizationStatus.PROVISIONAL;

    if (enabled) {
      const apnsToken = await messaging().getAPNSToken();
      if (apnsToken) {
        console.log('APN Token retrieved successfully:', apnsToken);
        ApptroveSDK.sendAPNToken(apnsToken);
      }
    }
  } catch (error) {
    console.log('Error initializing APNS:', error);
  }
};
import { Platform } from 'react-native';
import messaging from '@react-native-firebase/messaging';
import { TrackierSDK } from 'react-native-trackier';

const initializeAPNS = async () => {
  if (Platform.OS !== 'ios') return;

  try {
    await messaging().registerDeviceForRemoteMessages();
    const authStatus = await messaging().requestPermission();
    const enabled = authStatus === messaging.AuthorizationStatus.AUTHORIZED ||
                    authStatus === messaging.AuthorizationStatus.PROVISIONAL;

    if (enabled) {
      const apnsToken = await messaging().getAPNSToken();
      if (apnsToken) {
        console.log('APN Token retrieved successfully:', apnsToken);
        TrackierSDK.sendAPNToken(apnsToken);
      }
    }
  } catch (error) {
    console.log('Error initializing APNS:', error);
  }
};
9.3 Initialize APNS
Important: Call this function after the Apptrove SDK has been initialized.
// Initialize APNS after SDK initialization on iOS
if (Platform.OS === 'ios') {
  try {
    await initializeAPNS();
  } catch (apnsError) {
    console.log('Error initializing APNS:', apnsError);
  }
}
Step 10: Testing Uninstall Tracking
Local APN tokens do NOT work for uninstall tracking testing. You must upload your app to TestFlight and test with TestFlight APN tokens.
Testing with TestFlight
To properly test uninstall tracking, follow these steps:
- Upload your app to TestFlight via App Store Connect
- Install the app from TestFlight on a physical device
- Launch the app and grant notification permissions
- Capture the APN token using one of these methods:
Method 1: Send Token via Custom Event Parameter
Add this code to capture and send the token for testing purposes:
- ✓ Apptrove SDK (Recommended)
- Trackier SDK (Deprecating August 2026)
import { ApptroveSDK, ApptroveEvent } from 'react-native-apptrove';

// After getting APN token
const sendTokenForTesting = async (apnsToken) => {
  // Send to Apptrove SDK
  ApptroveSDK.sendAPNToken(apnsToken);

  // TESTING ONLY: Send token via custom event parameter
  const testEvent = new ApptroveEvent("apn_token_test");
  testEvent.param1 = apnsToken;  // Send token in param1
  ApptroveSDK.trackEvent(testEvent);
};
import { TrackierSDK, TrackierEvent } from 'react-native-trackier';

// After getting APN token
const sendTokenForTesting = async (apnsToken) => {
  // Send to Trackier SDK
  TrackierSDK.sendAPNToken(apnsToken);

  // TESTING ONLY: Send token via custom event parameter
  const testEvent = new TrackierEvent("apn_token_test");
  testEvent.param1 = apnsToken;  // Send token in param1
  TrackierSDK.trackEvent(testEvent);
};
Sending the APN token via a custom event parameter allows you to:
- Verify the token is being generated correctly
- See the token value in your dashboard for debugging
- Confirm the SDK is properly initialized and tracking events
Method 2: Check Xcode Console Logs
Run your app on a physical device (Simulator doesn't support APNs).
Check Xcode console logs. You should see:
APN Token retrieved successfully: [YOUR_APN_TOKEN]
Apn token Api response saved successfully
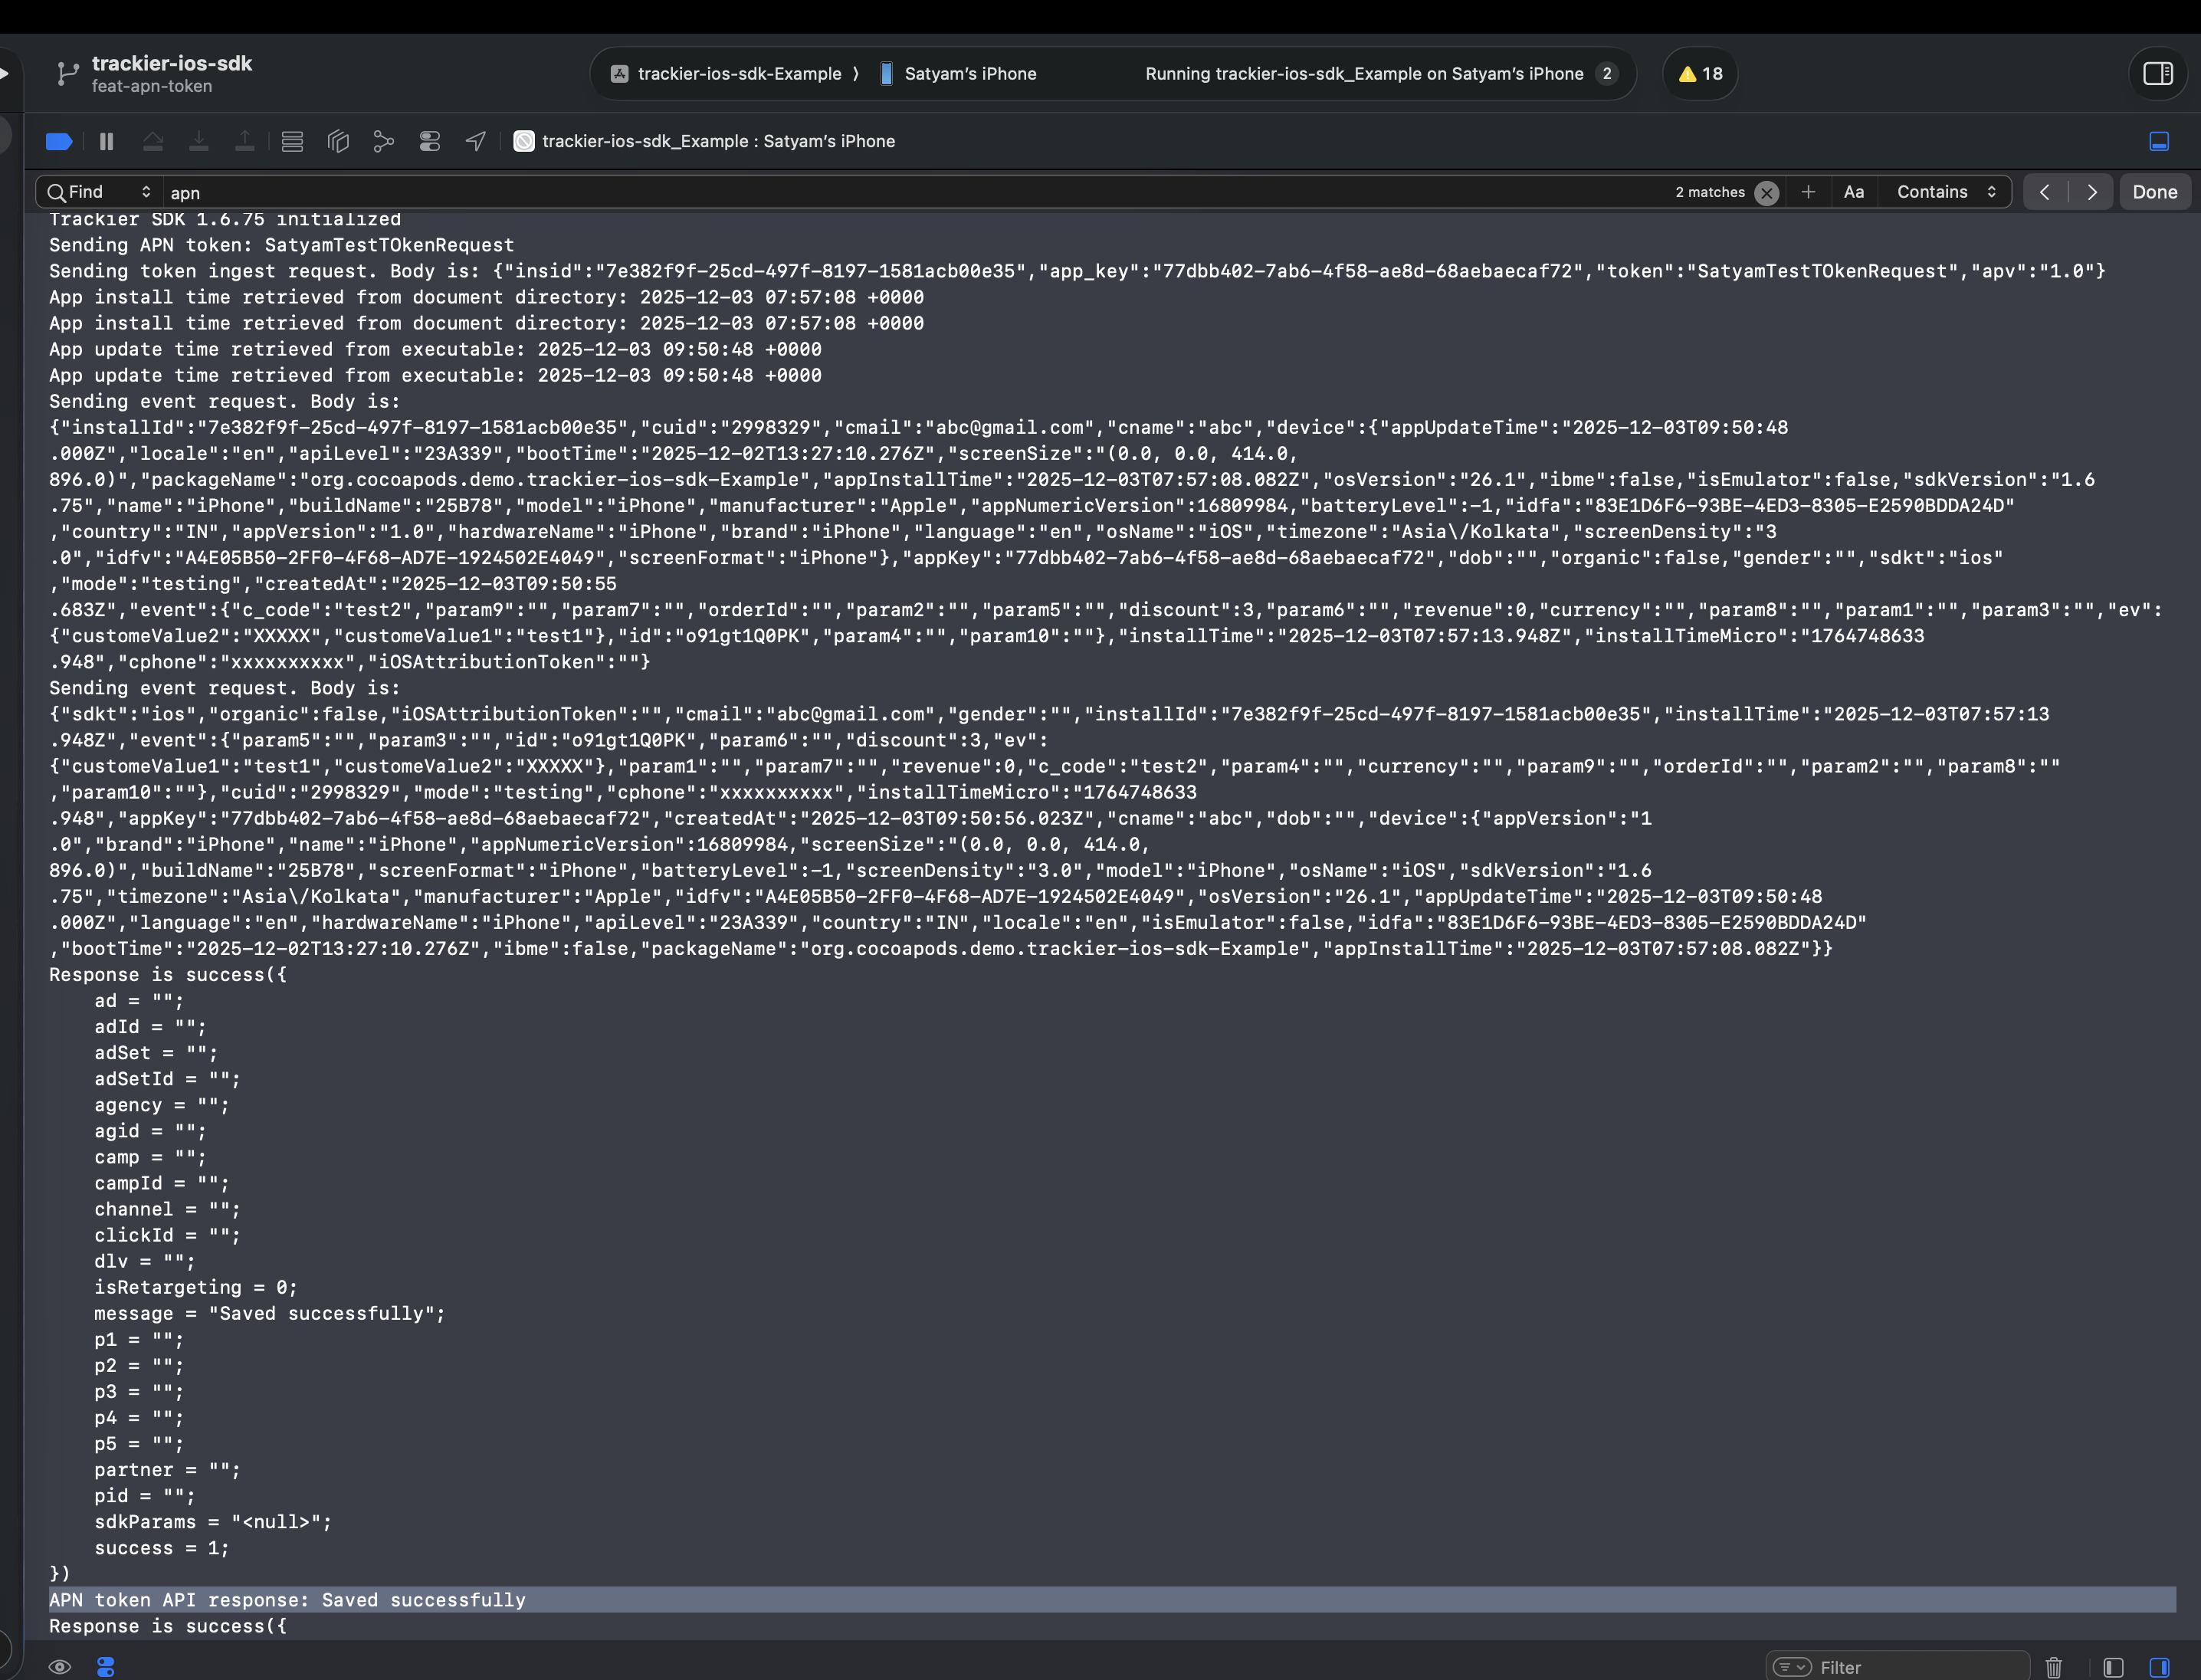
| Success: "Apn token Api response saved successfully"
Verify Token in Dashboard
After sending the token, verify it in your Apptrove dashboard:
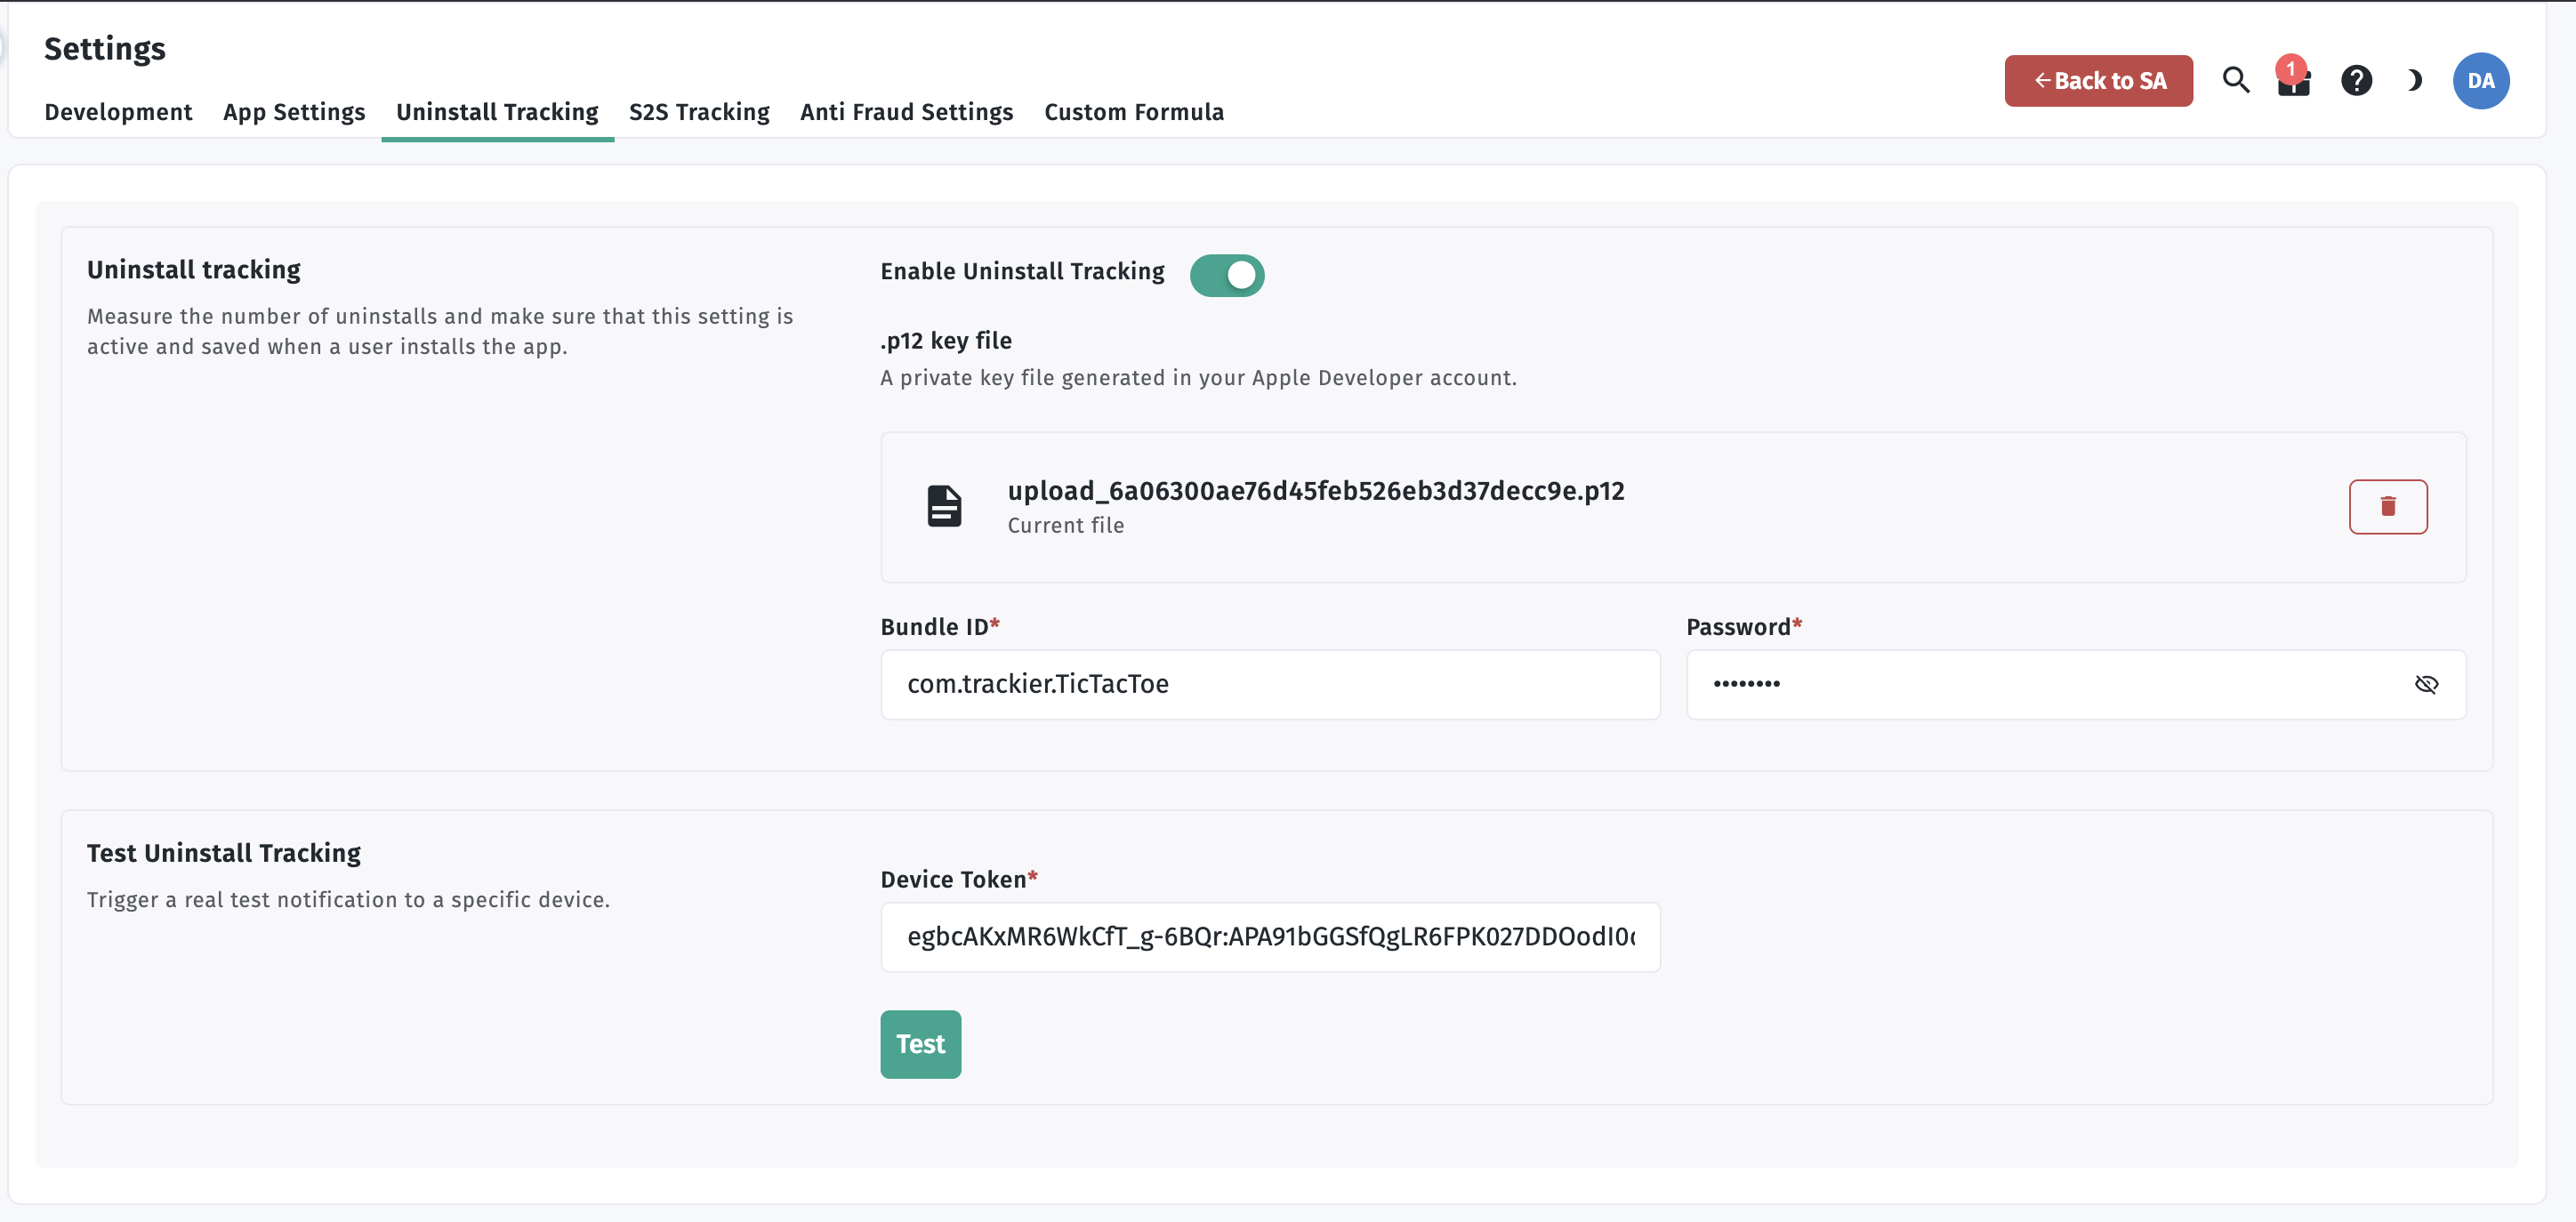
- Go to Apptrove Panel > Events or Logs
- Look for the
apn_token_testevent (if using Method 1) - Check the parameter value (p1) to see the captured token
- Verify the token matches what you see in Xcode logs
- Upload app to TestFlight
- Install from TestFlight on physical device
- Launch app and grant notification permission
- Check Xcode logs for APN token
- Send token via custom event parameter (optional)
- Verify token appears in Apptrove dashboard
- Uninstall app and wait 9+ days to see uninstall event
Troubleshooting
Issue: Token Not Generated
- Ensure Push Notifications capability is enabled in Xcode.
- Test on a physical device (not Simulator).
- Verify user granted notification permission.
Issue: "API Response Failed" Error
- Check
.p12certificate and password in Apptrove panel. - Ensure you are using a Production certificate for App Store builds.
- SDK must be initialized before calling
sendAPNToken.
Complete Flow Summary
- Keychain Access → Request Certificate → Save
.certSigningRequestfile - Apple Developer Portal → Identifiers → Select your App ID
- Configure Push Notifications → Enable and click Configure
- Upload Certificate Request → Download
.cerfile - Keychain Access → Export
.ceras.p12with password - Apptrove Panel → Upload
.p12file + password - Xcode → Enable Push Notifications + Background Modes
- Info.plist → Add user permission description
- React Native App → Call
ApptroveSDK.sendAPNToken(apnsToken)orTrackierSDK.sendAPNToken(apnsToken)per your SDK - Check Logs → Verify "Apn token Api response saved successfully"
SDK Method
sendAPNToken(token)
Send the APN token to Apptrove for uninstall tracking.
Usage (Apptrove):
if (Platform.OS === 'ios') {
  ApptroveSDK.sendAPNToken(apnsToken);
}
Usage (Trackier):
if (Platform.OS === 'ios') {
  TrackierSDK.sendAPNToken(apnsToken);
}
For support, contact support@apptrove.com.