Uninstall Tracking
This guide provides instructions for setting up uninstall tracking for Android apps using the Trackier Flutter SDK and Firebase Analytics. Uninstall tracking monitors user churn, enabling analysis of retention and optimization of acquisition strategies by sending uninstall data to Trackier.
Overview
Uninstall tracking uses Firebase Analytics to capture the app_remove event, which is automatically logged when an Android app is uninstalled. This data is sent to Trackier MMP via Firebase Cloud Functions, providing insights into user retention and campaign performance.
Setup
Follow these steps to configure uninstall tracking:
Step 1: Add Firebase Analytics to Your App
Integrate Firebase Analytics to track the app_remove event.
1.1 Install Firebase Core
If not already added, install the firebase_core package and initialize Firebase:
-
Add to your
pubspec.yaml:dependencies:
firebase_core: ^2.24.0 -
Run:
flutter pub get -
Initialize Firebase in
main.dart:
import 'package:firebase_core/firebase_core.dart';
import 'firebase_options.dart';

void main() async {
  WidgetsFlutterBinding.ensureInitialized();
  await Firebase.initializeApp(
    options: DefaultFirebaseOptions.currentPlatform,
  );
  runApp(MyApp());
}
1.2 Add Firebase Analytics Plugin
Install the firebase_analytics plugin:
From your Flutter project's root, run:
flutter pub add firebase_analytics
Rebuild your application:
flutter run
Import and initialize Firebase Analytics:
import 'package:firebase_analytics/firebase_analytics.dart';

FirebaseAnalytics analytics = FirebaseAnalytics.instance;
1.3 Set a Common Identifier
Set the Trackier ID as a Firebase user property to link analytics data:
Future<void> setTrackierUserProperty() async {
  var trackierId = await Trackierfluttersdk.getTrackierId();
  await analytics.setUserProperty(name: "ct_objectId", value: trackierId);
}
This sets the ct_objectId property to the Trackier ID, creating a common identifier for uninstall tracking.
Ensure the AppTrove SDK is initialized before calling getTrackierId().
Step 2: Set the app_remove Event as a Conversion Event
Configure the app_remove event as a conversion event in Firebase:
- Log in to the Firebase Console.
- Select your project and navigate to Analytics > Events.
- Find the
app_removeevent and enable the Mark as conversion toggle.
Step 3: Use Firebase Cloud Functions
Prerequisites
- Node.js 20.x or 22.x (use nvm for easy version management)
- Firebase CLI (
npm install -g firebase-tools) - Firebase project on Blaze plan (required for analytics triggers)
- Google account with access to Firebase Console
- App with Firebase Analytics SDK integrated
- Trackier account (for uninstall event tracking)
Set Up Node.js and Firebase CLI
# Install Node Version Manager (nvm) if not already installed
curl -o- https://raw.githubusercontent.com/nvm-sh/nvm/v0.39.7/install.sh | bash

# Install and use Node.js 22 (recommended)
nvm install 22
nvm use 22

# Install Firebase CLI globally
npm install -g firebase-tools

# Login to Firebase
firebase login
Create or Select Your Firebase Project
If you already have a Firebase project for your app:
- Go to Firebase Console
- Select your project
If you need to create a new Firebase project:
- In the Firebase Console, click Add project and follow the steps
- Link Google Analytics when prompted
- Register your Android app and download
google-services.jsonfor your app
Initialize Firebase Functions in Your Project Directory
# Create a new directory for your project (if needed)
mkdir YourProjectName
cd YourProjectName

# Initialize Firebase in this directory
firebase init functions
- Choose:
- Use an existing project (if you already have one) or create a new one
- Language: JavaScript
- ESLint: Yes (recommended)
- Install dependencies: Yes
Prepare Your Functions Directory
- Your folder structure should look like this:
YourProjectName/
  functions/
    index.js
    package.json
    .eslintrc.js
... - If you already have a
functionsdirectory, use it.
Add the Uninstall Tracking Function Code
Replace the contents of functions/index.js with:
const functions = require("firebase-functions");
const admin = require("firebase-admin");
const axios = require("axios");

// Set your SDK key here (or use environment variables for security)
const SDK_KEY = "YOUR_SDK_KEY_HERE";

admin.initializeApp();

// Defensive: Only export analytics trigger if available
if (!functions.analytics) {
  // This will prevent deployment errors in unsupported environments
  console.warn("Analytics triggers are not available in this environment.");
  exports.sendAndroidUninstallToTrackierApptrove = () => {};
} else {
  exports.sendAndroidUninstallToTrackierApptrove = functions.analytics
      .event("app_remove")
      .onLog(async (event) => {
      // Defensive extraction of user properties
        const userProps =
        event.user && event.user.userProperties ?
          event.user.userProperties :
          {};
        const installId =
        userProps.ct_objectId && userProps.ct_objectId.value ?
          userProps.ct_objectId.value :
          "";
        const mode =
        userProps.ct_mode && userProps.ct_mode.value ?
          userProps.ct_mode.value :
          "production";
        const cuid =
        userProps.ct_uid && userProps.ct_uid.value ?
          userProps.ct_uid.value :
          "";
        const cmail =
        userProps.ct_mail && userProps.ct_mail.value ?
          userProps.ct_mail.value :
          "";

        if (!installId) {
          functions.logger.warn(
              "No ct_objectId found in event",
              {userProps},
          );
          return null;
        }

        const url = "https://events.trackier.io/v1/uninstall";
        const data = {
          installId,
          sdkKey: SDK_KEY,
          mode,
          cuid,
          cmail,
          meta: event,
        };

        try {
          const response = await axios.post(
              url,
              data,
              {
                headers: {"Content-Type": "application/json"},
                timeout: 10000,
              },
          );
          functions.logger.log(
              "Tracked uninstall",
              {
                installId,
                status: response.status,
                data: response.data,
              },
          );
        } catch (error) {
          functions.logger.error(
              "Uninstall tracking failed",
              {
                installId,
                status: error.response ? error.response.status : "N/A",
                data: error.response ? error.response.data : error.message,
              },
          );
        }
        return null;
      });
}
Set Up Dependencies In package.json
{
  "name": "functions",
  "description": "Cloud Functions for Firebase",
  "scripts": {
    "lint:fix": "eslint . --fix",
    "lint": "eslint .",
    "serve": "firebase emulators:start --only functions",
    "shell": "firebase functions:shell",
    "start": "npm run shell",
    "deploy": "firebase deploy --only functions",
    "logs": "firebase functions:log"
  },
  "engines": {
    "node": "20"
  },
  "main": "index.js",
  "dependencies": {
    "axios": "^1.10.0",
    "firebase-admin": "^11.0.0",
    "firebase-functions": "^3.23.0"
  },
  "devDependencies": {
    "eslint": "^8.15.0",
    "eslint-config-google": "^0.14.0"
  },
  "private": true
}
ESLint Configuration
Create a .eslintrc.js file in your functions directory:
// .eslintrc.js
module.exports = {
  parserOptions: {
    ecmaVersion: 2020, // or at least 2015
    sourceType: 'module', // if you're using ES modules (import/export)
  },
  env: {
    es6: true,
    node: true, // if you're in a Node.js environment
  },
};
Deploy Your Function And Fix link Error
# In the functions directory
cd functions

# Install dependencies
npm install

# (Optional) Run linter and auto-fix issues
npm run lint:fix

firebase deploy --only functions
- If you see errors about CPU/Gen 2 or function already existing as 2nd Gen:
firebase functions:delete sendAndroidUninstallToTrackierApptrove --force

// After delete your function redeploy the function

firebase deploy --only functions - Ignore warnings about outdated
firebase-functionsif you need analytics triggers.
Verify and Debug
A. See Data in Firebase Console
- Go to Firebase Console
- Select your project
- Navigate to Analytics > Dashboard and look for the
app_removeevent
B. Use Analytics DebugView
- In the Firebase Console, go to Analytics > DebugView
- Enable DebugView on your device:
adb shell setprop debug.firebase.analytics.app <your.app.package>
# Example:
adb shell setprop debug.firebase.analytics.app com.example.myapp
# To turn off:
adb shell setprop debug.firebase.analytics.app .none. - Open your app and trigger uninstall or other events
- Watch for real-time events in DebugView
C. Check Cloud Function Logs
- In Firebase Console: Build > Functions > View logs
- monitor the status of your cloud function here:
https://console.cloud.google.com/functions/list
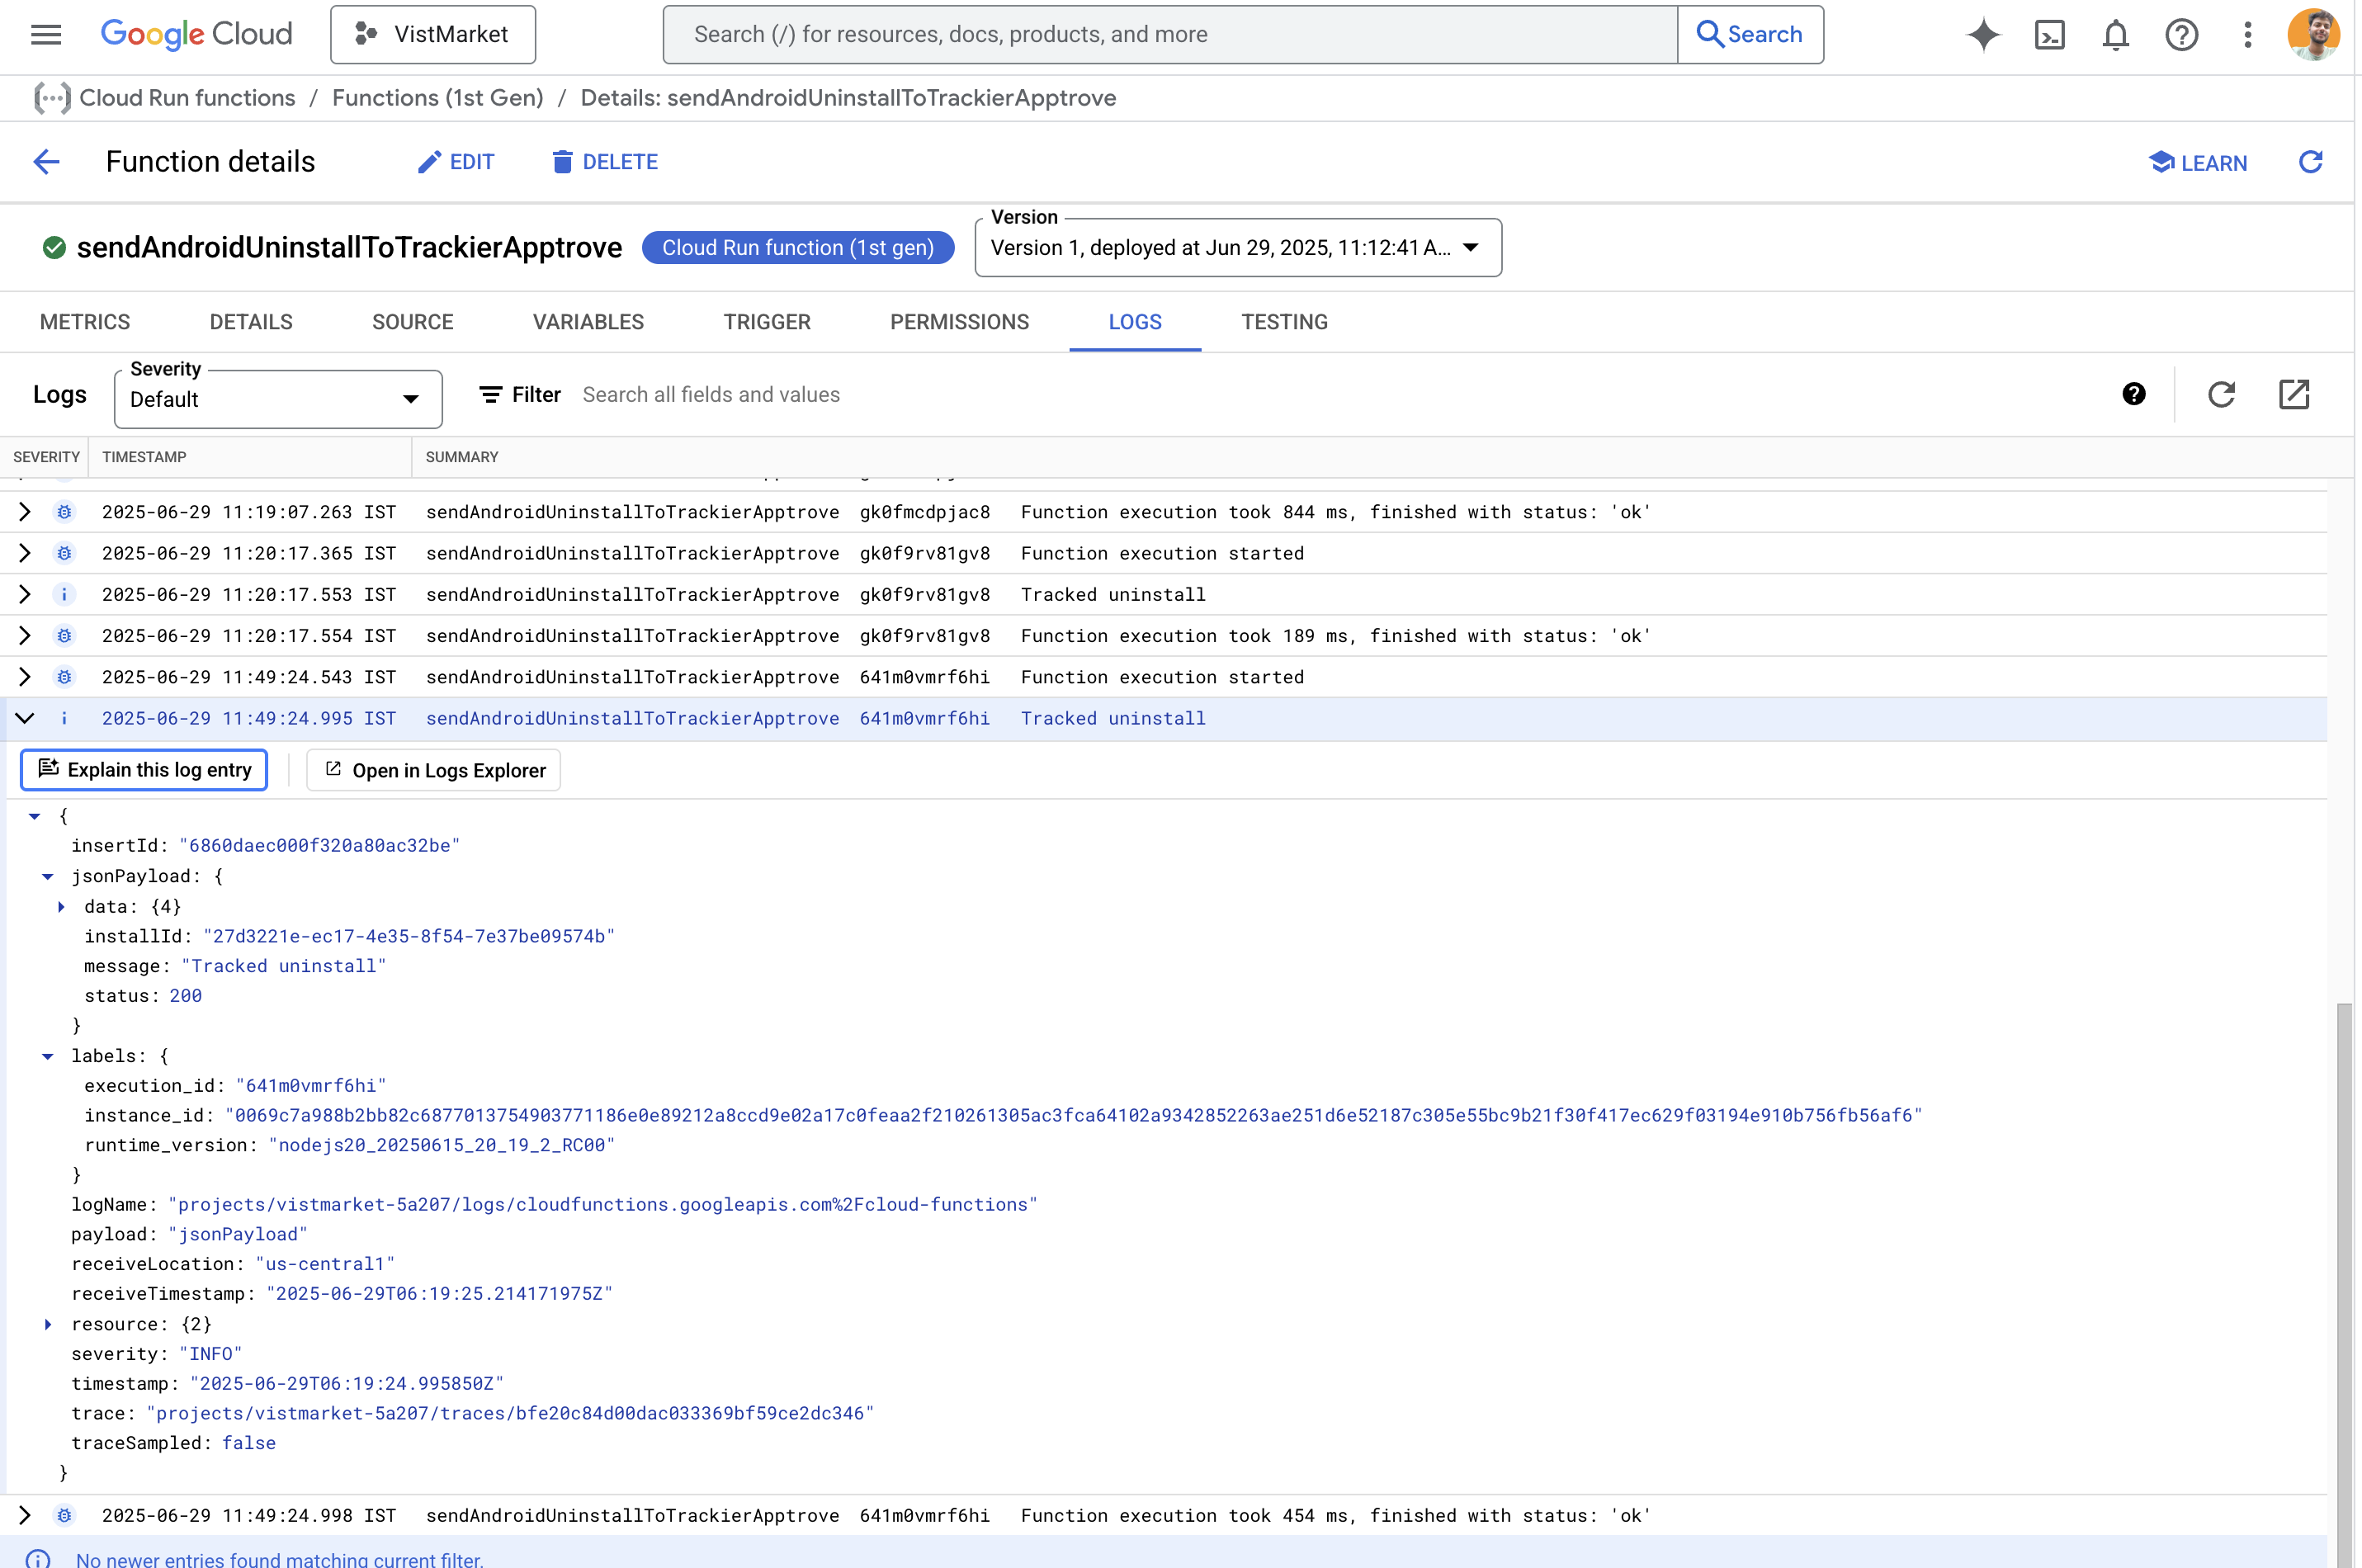
- Look for logs like
Tracked uninstallorUninstall tracking failed
D. Check Trackier Uninstall Log
- Log in to your [Trackier dashboard]
- Navigate to uninstall/event logs
- Filter by
installIdor other user properties - Confirm the uninstall event was received
![]()
Troubleshooting & Tips
- Analytics triggers not working?
- Make sure you are on Blaze plan and Analytics is linked
- Only deploy to production (not emulator)
- Use
firebase-functions@3.xandfirebase-admin@11.x
- CPU/Gen 2 errors?
- Remove any
"cpu"option fromfirebase.jsonor CLI flags - Delete the function if it was previously deployed as Gen 2, then redeploy
- Remove any
- Dependency conflicts?
- Downgrade
firebase-adminto^11.0.0if needed
- Downgrade
- Linting errors?
- Use
npm run lint:fixand break up long lines/fix indentation
- Use
- Function not triggering?
- Ensure your app is setting the user property:
await analytics.setUserProperty(name: "ct_objectId", value: trackierId); - Use Analytics DebugView to verify the event is sent
- Ensure your app is setting the user property:
- Still stuck?
Best Practices
- Test Firebase Integration: Verify Firebase Analytics is correctly set up by logging custom events and checking the Firebase Console.
- Secure Firebase Configuration: Store
google-services.jsonsecurely and avoid committing it to public repositories. - Call Setup Early: Execute the uninstall tracking setup code as early as possible in the app lifecycle to ensure the Trackier ID is set.
- Monitor Uninstall Data: Regularly check the Trackier Panel to analyze uninstall trends and optimize retention strategies.
- Comply with Privacy Regulations: Ensure uninstall tracking complies with GDPR, CCPA, and other privacy laws, obtaining user consent where required.
- Use Development Environment: Test uninstall tracking in development mode to avoid affecting production data.
For further assistance, refer to the Trackier Documentation Portal or contact Trackier support at support@trackier.com.