Events Tracking
Choose your SDK version below:
- Apptrove SDK → Recommended for all projects (Latest: v2.x.x)
- Trackier SDK → Will be deprecated in August 2026 (Latest legacy: v1.x.xx)
Use the tabs below for SDK-specific snippets.
The Apptrove Cordova SDK enables tracking of user interactions through events, providing insights into how users engage with your app. This section covers retrieving event IDs from the Apptrove Panel, tracking built-in events, custom events, revenue events, and passing user data to enhance analytics.
Prerequisites
- Apptrove Cordova SDK installed and initialized in your project (Apptrove recommended)
- Apptrove account with access to the Apptrove Panel
- Cordova 9.0 or later
- For Ionic Native apps:
- Ionic CLI and Capacitor
@awesome-cordova-plugins/coreinstalled (Trackier legacy only:trackierplugin configured)
- Basic knowledge of JavaScript, Angular (for Ionic Native), and Cordova development
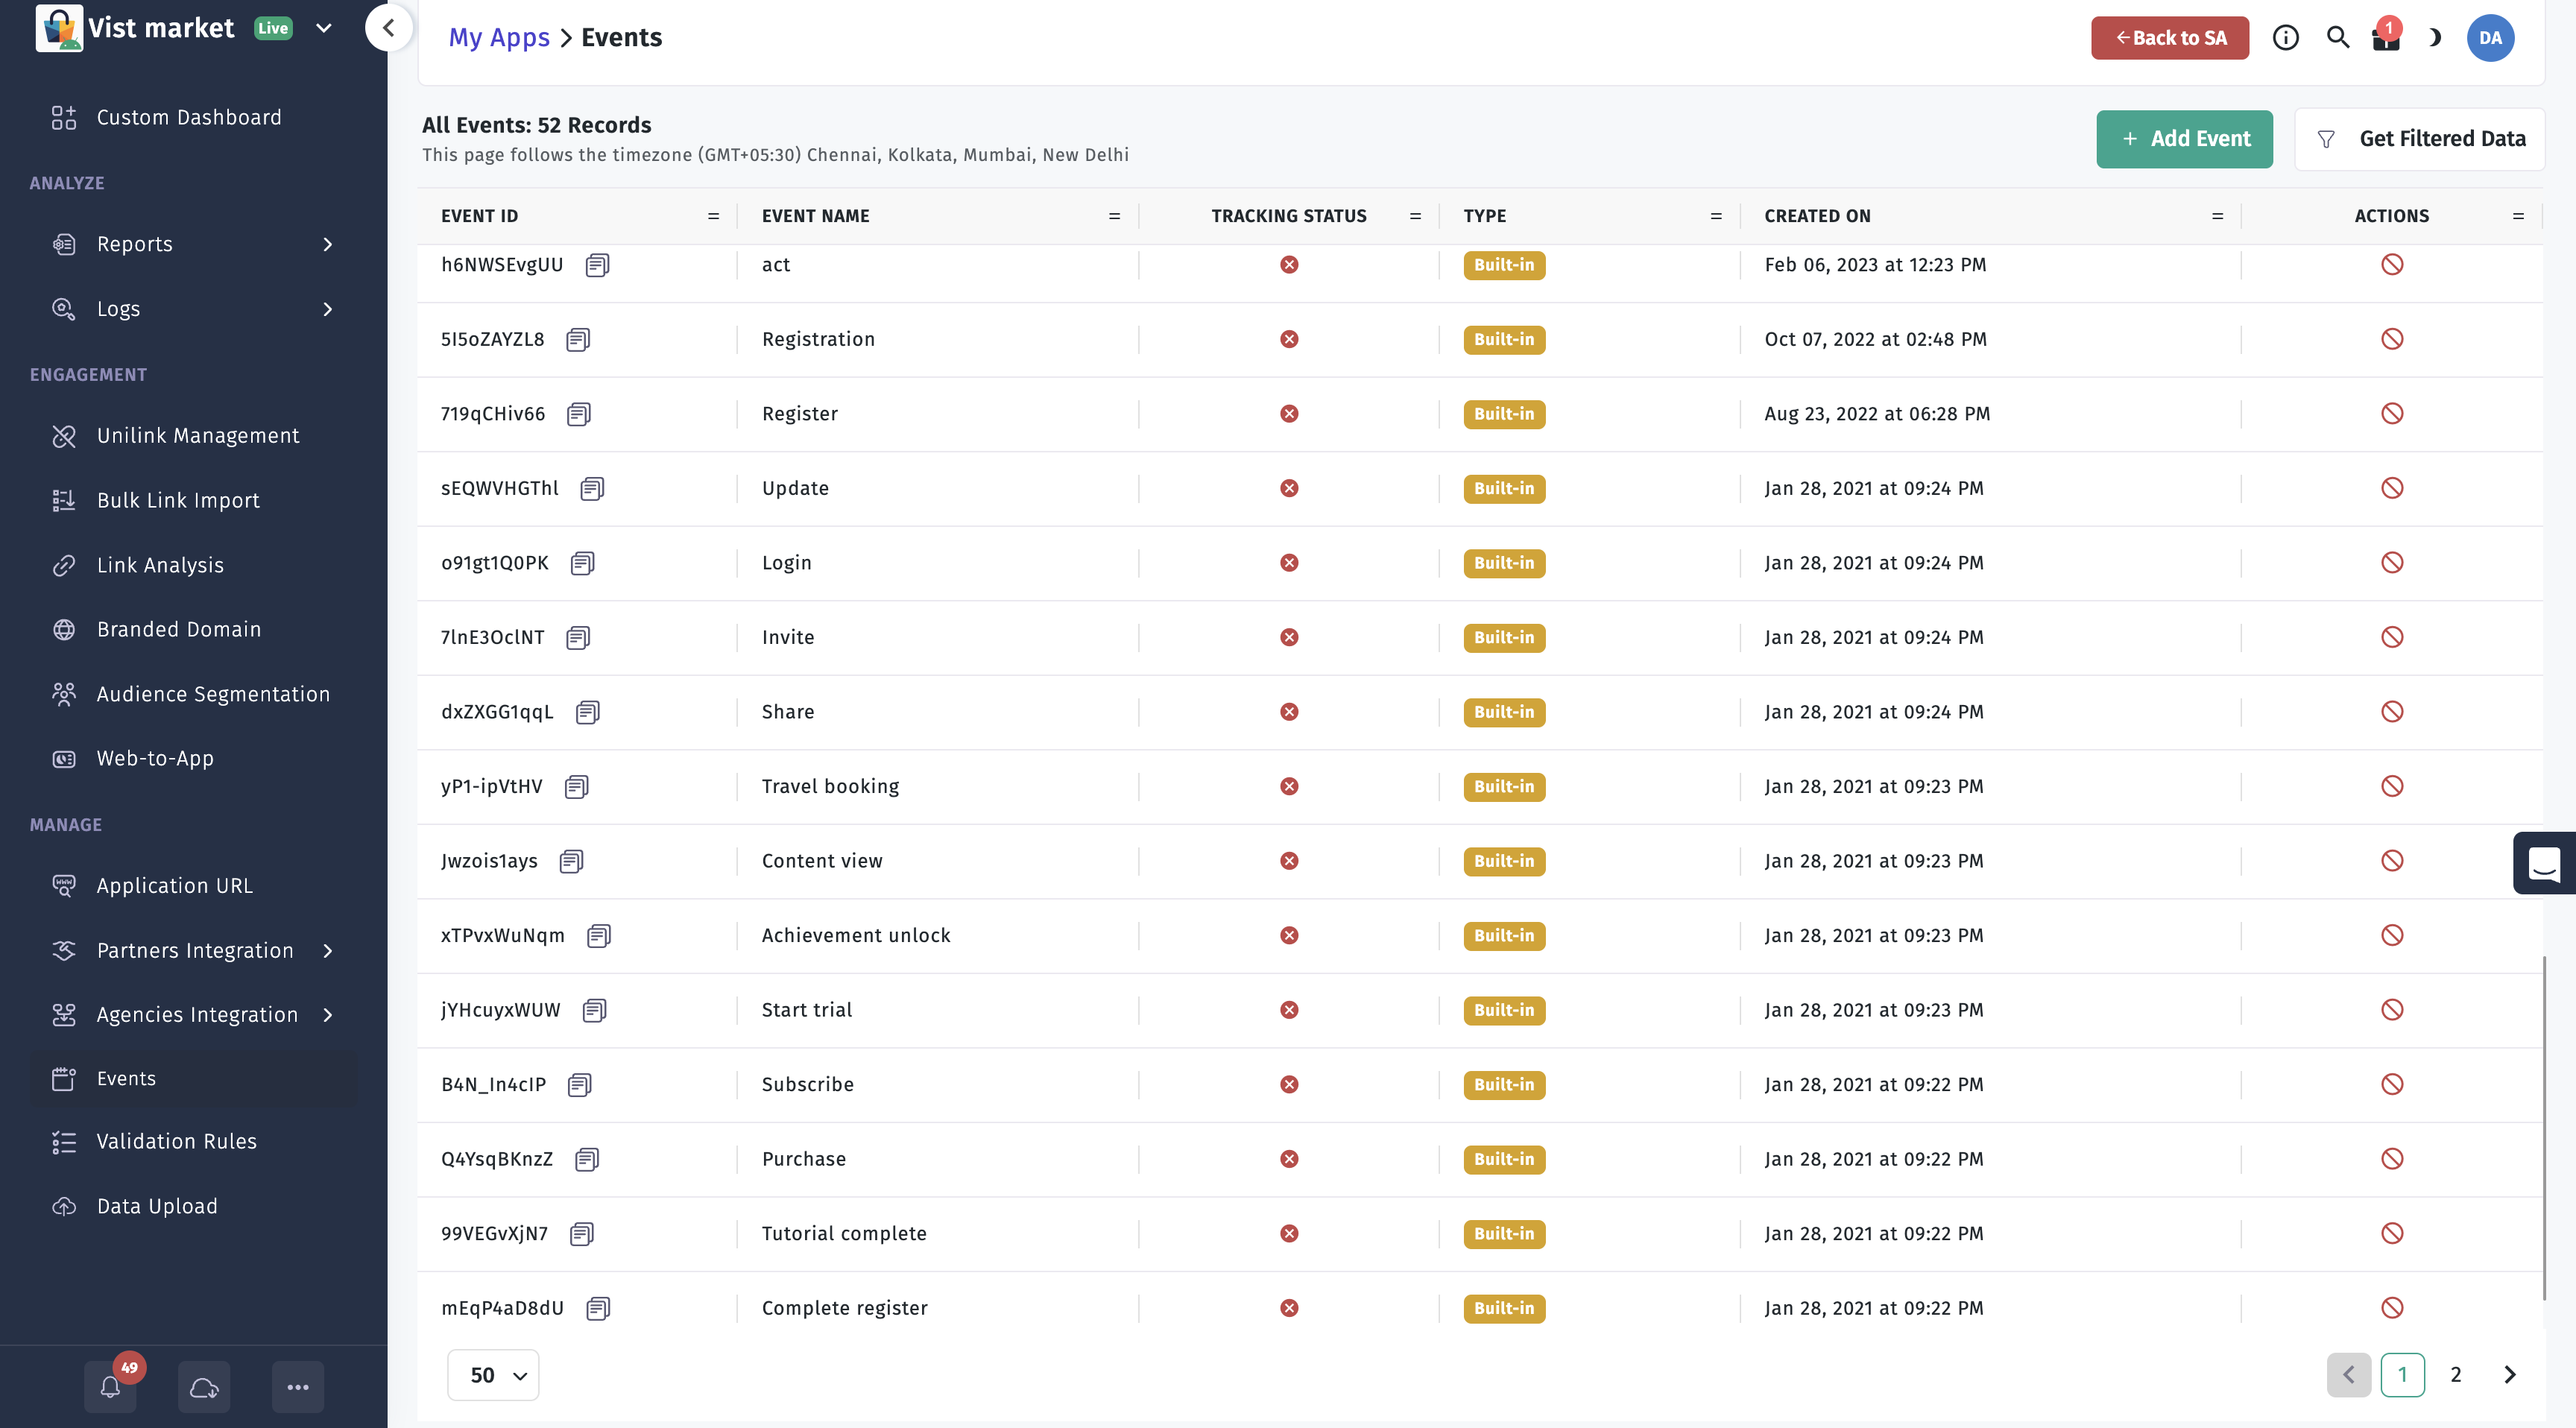
Retrieve Event ID from Dashboard
To track events, you need the event ID from the Apptrove Panel.
Steps to Retrieve Event ID
- Log in to your Apptrove account.
- Select your application from the Dashboard.
- Navigate to the Events section.
- Copy the event ID for the desired built-in or custom event.
Built-in Events
Built-in events are predefined in the Apptrove dashboard and can be tracked using event IDs like 1CFfUn3xEY for events such as purchases or add-to-cart actions.
Available Parameters
orderId,revenue,currencyparam1toparam10couponCode
Steps to Track Built-in Events
- Create an event object (
AppTroveEventfor Apptrove /TrackierEventfor Trackier legacy) with the built-in event ID. - Optionally, set parameters like
param1,couponCode, or user data. - Call
trackierCordovaPlugin.trackEventto track the event.
JavaScript Example (Ionic Native)
- ✓ Apptrove SDK (Recommended)
- Trackier SDK (Deprecating August 2026)
import { Component } from '@angular/core';
import { AppTroveCordovaPlugin, AppTroveConfig, AppTroveEnvironment, AppTroveEvent } from 'com.apptrove.cordova_sdk/ionic-native/apptrove/ngx';

@Component({
  selector: 'app-tab3',
  templateUrl: 'tab3.page.html',
  styleUrls: ['tab3.page.scss']
})
export class Tab3Page {
  constructor(private apptroveCordovaPlugin: AppTroveCordovaPlugin) {}

  async ngOnInit() {
    // Initialize SDK
    var key = "0455721b-XXXX-XXXXX-596d818d910a";
    var appTroveConfig = new AppTroveConfig(key, AppTroveEnvironment.Development);
    this.apptroveCordovaPlugin.initializeSDK(appTroveConfig);

    // Track Built-in Event
    var appTroveEvent = new AppTroveEvent("1CFfUn3xEY"); // Built-in event ID
    appTroveEvent.setParam1("Param 1");
    appTroveEvent.setParam2("Param 2");
    appTroveEvent.setParam3("Param 3");
    appTroveEvent.setParam4("Param 4");
    appTroveEvent.setParam5("Param 5");
    appTroveEvent.setCouponCode("TestCode");
    this.apptroveCordovaPlugin.setUserId("TestUserId");
    this.apptroveCordovaPlugin.setUserName("Test");
    this.apptroveCordovaPlugin.setUserPhone("8130XXX721");
    this.apptroveCordovaPlugin.setUserEmail("abc@gmail.com");
    this.apptroveCordovaPlugin.trackEvent(appTroveEvent);
  }
}
import { Component } from '@angular/core';
import { TrackierCordovaPlugin, TrackierConfig, TrackierEnvironment, TrackierEvent } from '@awesome-cordova-plugins/trackier/ngx';

@Component({
  selector: 'app-tab3',
  templateUrl: 'tab3.page.html',
  styleUrls: ['tab3.page.scss']
})
export class Tab3Page {
  constructor(private trackierCordovaPlugin: TrackierCordovaPlugin) {}

  async ngOnInit() {
    // Initialize SDK
    var key = "0455721b-XXXX-XXXXX-596d818d910a";
    var trackierConfig = new TrackierConfig(key, TrackierEnvironment.Development);
    this.trackierCordovaPlugin.initializeSDK(trackierConfig);

    // Track Built-in Event
    var trackierEvent = new TrackierEvent("1CFfUn3xEY"); // Built-in event ID
    trackierEvent.setParam1("Param 1");
    trackierEvent.setParam2("Param 2");
    trackierEvent.setParam3("Param 3");
    trackierEvent.setParam4("Param 4");
    trackierEvent.setParam5("Param 5");
    trackierEvent.setCouponCode("TestCode");
    this.trackierCordovaPlugin.setUserId("TestUserId");
    this.trackierCordovaPlugin.setUserName("Test");
    this.trackierCordovaPlugin.setUserPhone("8130XXX721");
    this.trackierCordovaPlugin.setUserEmail("abc@gmail.com");
    this.trackierCordovaPlugin.trackEvent(trackierEvent);
  }
}
Custom Events
Custom events are user-defined in the Apptrove dashboard to track app-specific actions tailored to your business logic.
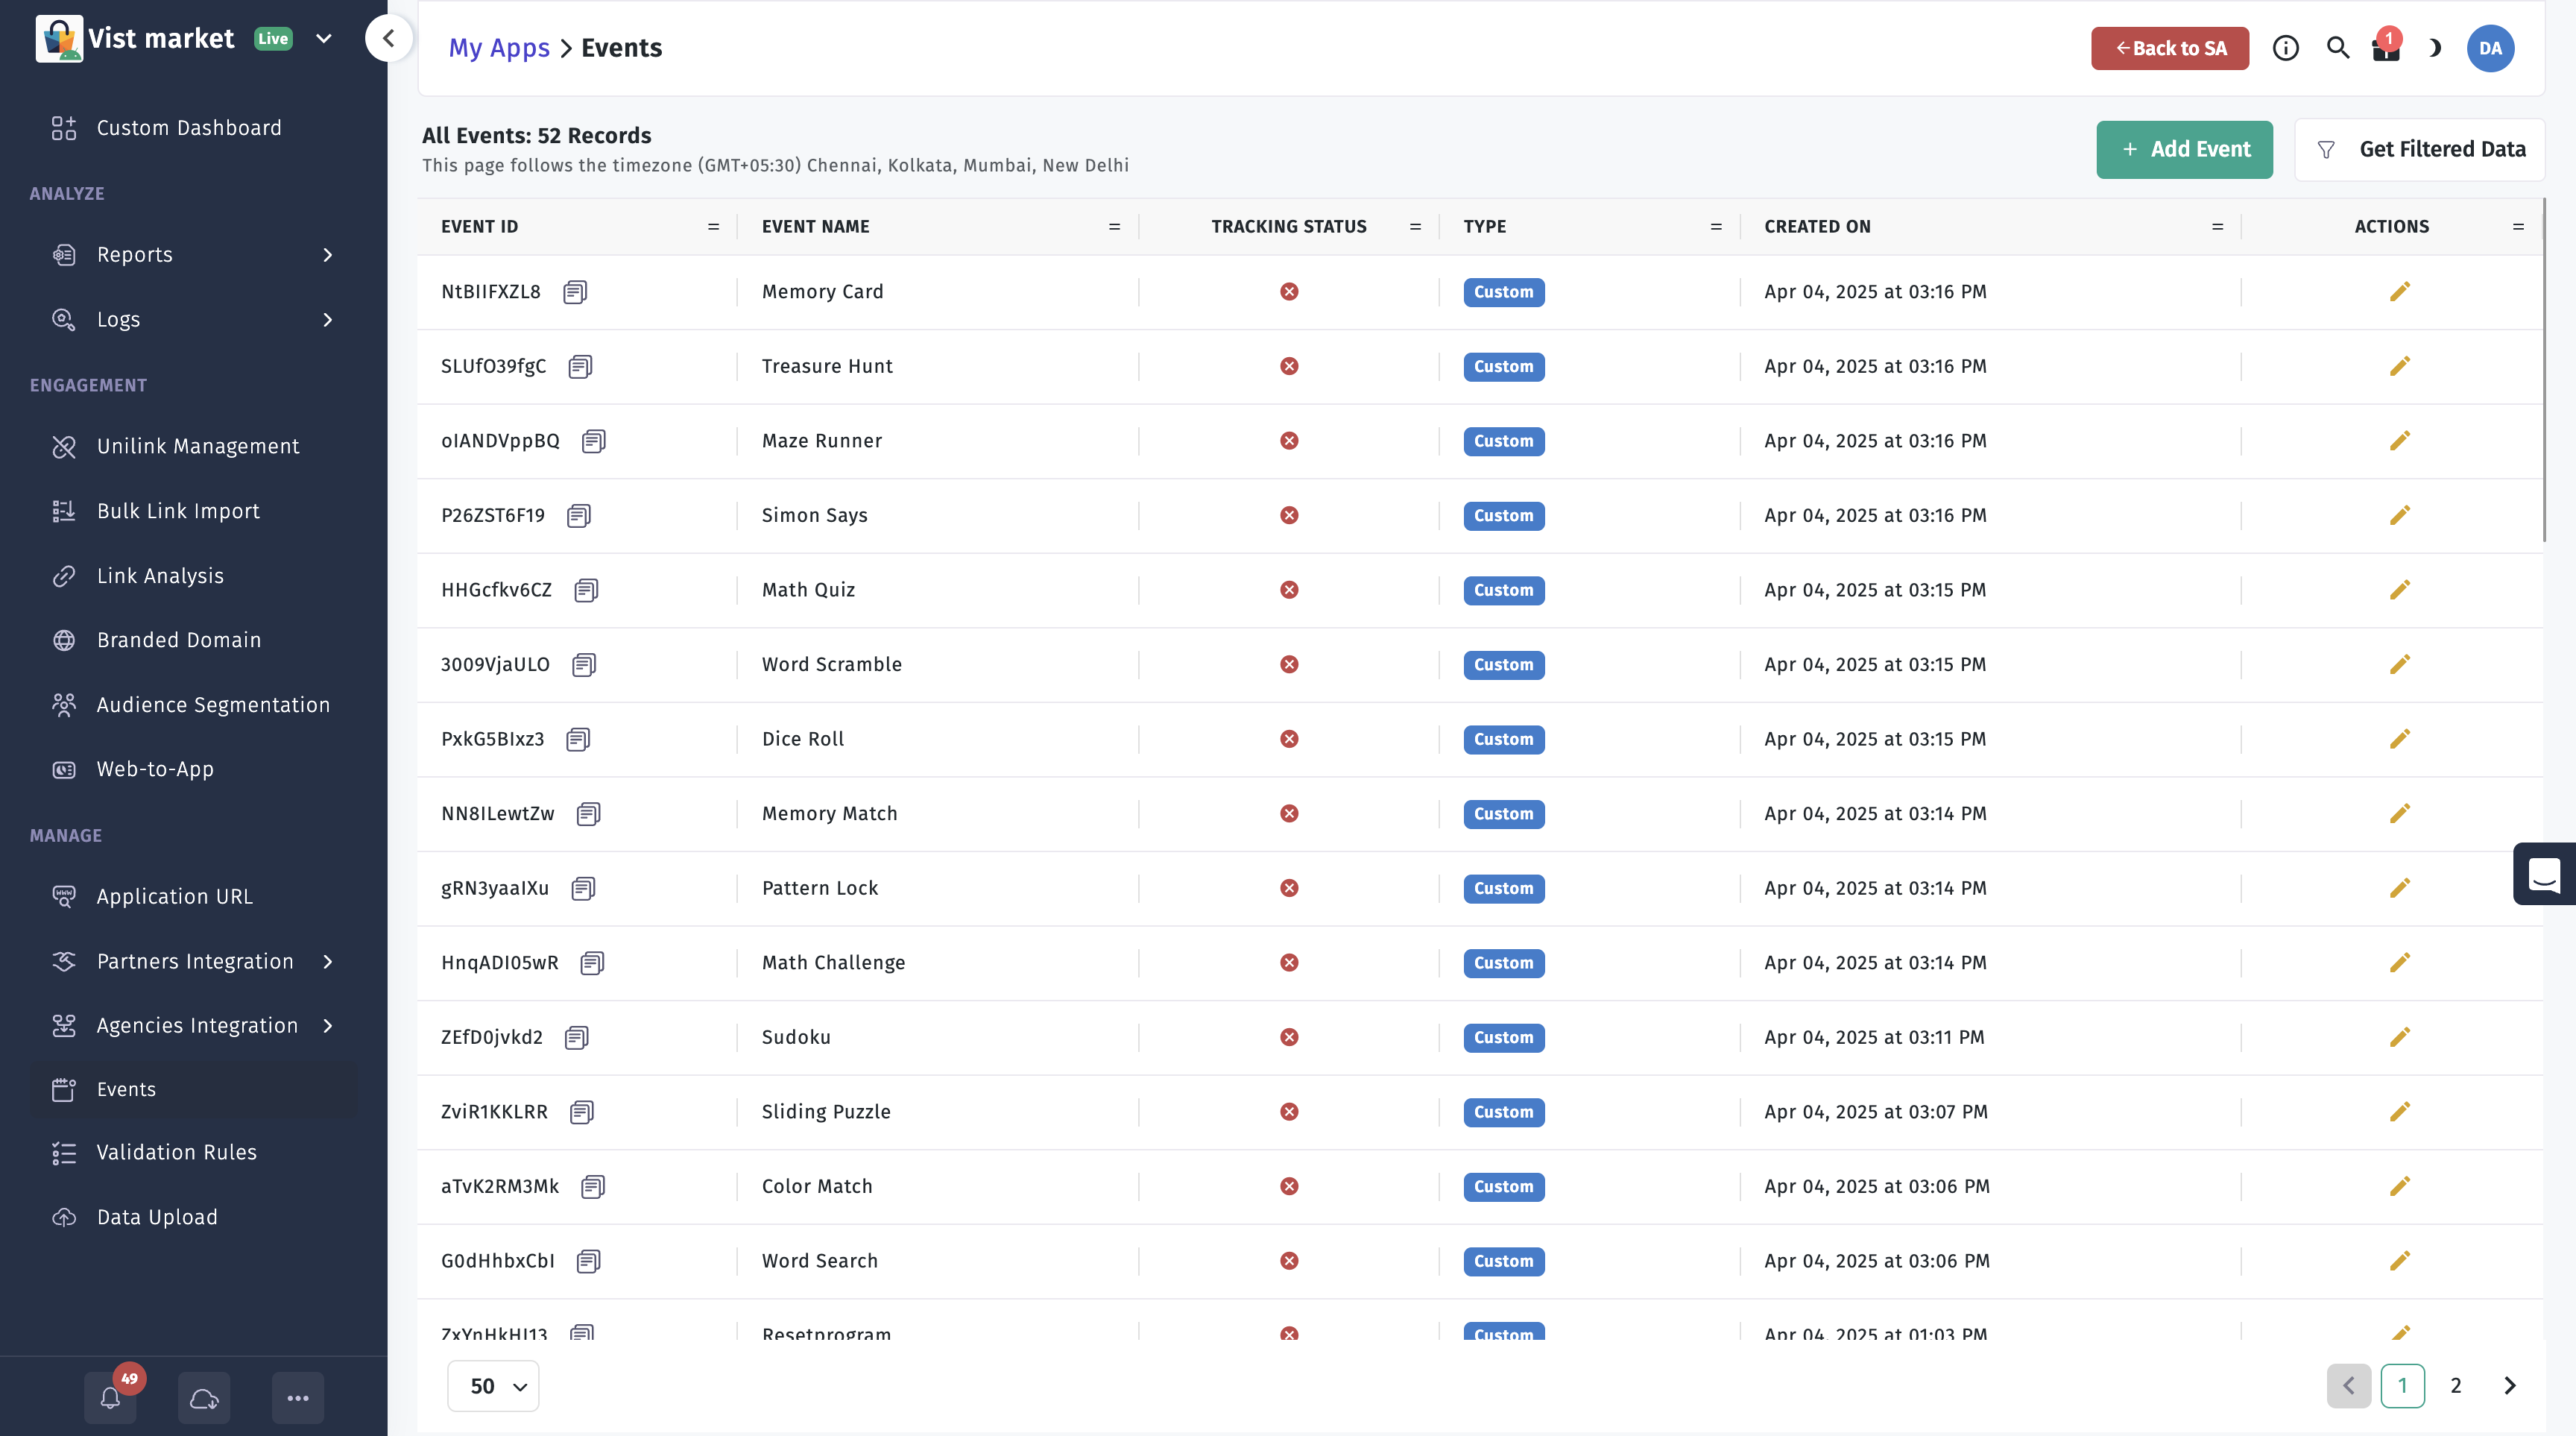
Steps to Track Custom Events
- Create a custom event in the Apptrove Panel under the Events section.
- Note the event ID for the custom event.
- Use
AppTroveEvent(Apptrove) orTrackierEvent(Trackier legacy) with the custom event ID to track the event.
JavaScript Example (Ionic Native)
- ✓ Apptrove SDK (Recommended)
- Trackier SDK (Deprecating August 2026)
import { Component } from '@angular/core';
import { AppTroveCordovaPlugin, AppTroveConfig, AppTroveEnvironment, AppTroveEvent } from 'com.apptrove.cordova_sdk/ionic-native/apptrove/ngx';

@Component({
  selector: 'app-tab3',
  templateUrl: 'tab3.page.html',
  styleUrls: ['tab3.page.scss']
})
export class Tab3Page {
  constructor(private apptroveCordovaPlugin: AppTroveCordovaPlugin) {}

  async ngOnInit() {
    // Initialize SDK
    var key = "0455721b-XXXX-XXXXX-596d818d910a";
    var appTroveConfig = new AppTroveConfig(key, AppTroveEnvironment.Development);
    this.apptroveCordovaPlugin.initializeSDK(appTroveConfig);

    // Track Custom Event
    var appTroveEvent = new AppTroveEvent("YOUR_CUSTOM_EVENT_ID"); // Custom event ID
    appTroveEvent.setParam1("Param 1");
    appTroveEvent.setParam2("Param 2");
    appTroveEvent.setParam3("Param 3");
    appTroveEvent.setParam4("Param 4");
    appTroveEvent.setParam5("Param 5");
    appTroveEvent.setCouponCode("TestCode");
    this.apptroveCordovaPlugin.setUserId("TestUserId");
    this.apptroveCordovaPlugin.setUserName("Test");
    this.apptroveCordovaPlugin.setUserPhone("8130XXX721");
    this.apptroveCordovaPlugin.setUserEmail("abc@gmail.com");
    this.apptroveCordovaPlugin.trackEvent(appTroveEvent);
  }
}
import { Component } from '@angular/core';
import { TrackierCordovaPlugin, TrackierConfig, TrackierEnvironment, TrackierEvent } from '@awesome-cordova-plugins/trackier/ngx';

@Component({
  selector: 'app-tab3',
  templateUrl: 'tab3.page.html',
  styleUrls: ['tab3.page.scss']
})
export class Tab3Page {
  constructor(private trackierCordovaPlugin: TrackierCordovaPlugin) {}

  async ngOnInit() {
    // Initialize SDK
    var key = "0455721b-XXXX-XXXXX-596d818d910a";
    var trackierConfig = new TrackierConfig(key, TrackierEnvironment.Development);
    this.trackierCordovaPlugin.initializeSDK(trackierConfig);

    // Track Custom Event
    var trackierEvent = new TrackierEvent("YOUR_CUSTOM_EVENT_ID"); // Custom event ID
    trackierEvent.setParam1("Param 1");
    trackierEvent.setParam2("Param 2");
    trackierEvent.setParam3("Param 3");
    trackierEvent.setParam4("Param 4");
    trackierEvent.setParam5("Param 5");
    trackierEvent.setCouponCode("TestCode");
    this.trackierCordovaPlugin.setUserId("TestUserId");
    this.trackierCordovaPlugin.setUserName("Test");
    this.trackierCordovaPlugin.setUserPhone("8130XXX721");
    this.trackierCordovaPlugin.setUserEmail("abc@gmail.com");
    this.trackierCordovaPlugin.trackEvent(trackierEvent);
  }
}
3. Complete Event Tracking Example
This comprehensive example demonstrates how to track a COMPLETE_REGISTRATION event with all available parameters, user data, and custom attributes.
- ✓ Apptrove SDK (Recommended)
- Trackier SDK (Deprecating August 2026)
import { Component } from '@angular/core';
import { AppTroveCordovaPlugin, AppTroveConfig, AppTroveEnvironment, AppTroveEvent } from 'com.apptrove.cordova_sdk/ionic-native/apptrove/ngx';

@Component({
  selector: 'app-tab3',
  templateUrl: 'tab3.page.html',
  styleUrls: ['tab3.page.scss']
})
export class Tab3Page {
  constructor(private apptroveCordovaPlugin: AppTroveCordovaPlugin) {}

  async trackCompleteRegistration() {

    // Create event with an event ID from Apptrove Panel
    var event = new AppTroveEvent("B4N_In4cIP");

    // Built-in fields for event tracking
    event.setOrderId("REG_001");          // String: Unique registration ID
    event.setProductId("FREE_PLAN");      // String: Plan or product ID
    event.setCurrency("USD");             // String: Currency code
    event.setCouponCode("343434234");     // String: Coupon code used
    event.setDiscount(3.1415);            // number: Discount applied
    event.setRevenue(34234234.32423);     // number: Revenue (or 0.0 for free signup)

    // Custom parameters for structured data
    // Data type: String - You can add any string value here
    event.setParam1("Test1");     // String: Dummy value
    event.setParam2("Test2");     // String: Dummy value
    event.setParam3("Test3");     // String: Dummy value
    event.setParam4("Test4");     // String: Dummy value
    event.setParam5("Test5");     // String: Dummy value
    event.setParam6("Test6");     // String: Dummy value
    event.setParam7("Test7");     // String: Dummy value
    event.setParam8("Test8");     // String: Dummy value
    event.setParam9("Test9");     // String: Dummy value
    event.setParam10("Test10");   // String: Dummy value

    // Note: use param1-param10 for custom values in Cordova plugin wrapper.

    // Set user details in AppTrove SDK
    await this.apptroveCordovaPlugin.setUserId("USER123");              // String: User ID
    await this.apptroveCordovaPlugin.setUserEmail("user@example.com");  // String: User email
    await this.apptroveCordovaPlugin.setUserName("Jane Doe");           // String: User name
    await this.apptroveCordovaPlugin.setUserPhone("+1234567890");       // String: User phone
    await this.apptroveCordovaPlugin.setDOB("1990-01-01");             // String: Date of birth (YYYY-MM-DD)
    await this.apptroveCordovaPlugin.setGender("Male");                 // String: Gender (Male, Female, or Others)

    // Additional user details
    // Note: Cordova SDK does not have a direct method for additional user details like other SDKs
    // You can pass additional data as custom event parameters or handle it via your app logic

    event.setParam8("FREE_PLAN");
    event.setParam9("Email");
    event.setParam10("1.0.0");

    // Send the event to AppTrove
    this.apptroveCordovaPlugin.trackEvent(event);
  }
}
import { Component } from '@angular/core';
import { TrackierCordovaPlugin, TrackierConfig, TrackierEnvironment, TrackierEvent } from '@awesome-cordova-plugins/trackier/ngx';

@Component({
  selector: 'app-tab3',
  templateUrl: 'tab3.page.html',
  styleUrls: ['tab3.page.scss']
})
export class Tab3Page {
  constructor(private trackierCordovaPlugin: TrackierCordovaPlugin) {}

  async trackCompleteRegistration() {

    // Create event with COMPLETE_REGISTRATION ID or Custom Event ID
    var event = new TrackierEvent(TrackierEvent.COMPLETE_REGISTRATION);
    // Alternatively: const event = new TrackierEvent("w43424"); // Pass your custom Event ID

    // Built-in fields for event tracking
    event.setOrderId("REG_001");          // String: Unique registration ID
    event.setProductId("FREE_PLAN");      // String: Plan or product ID
    event.setCurrency("USD");             // String: Currency code
    event.setCouponCode("343434234");     // String: Coupon code used
    event.setDiscount(3.1415);            // number: Discount applied
    event.setRevenue(34234234.32423);     // number: Revenue (or 0.0 for free signup)

    // Custom parameters for structured data
    // Data type: String - You can add any string value here
    event.setParam1("Test1");     // String: Dummy value
    event.setParam2("Test2");     // String: Dummy value
    event.setParam3("Test3");     // String: Dummy value
    event.setParam4("Test4");     // String: Dummy value
    event.setParam5("Test5");     // String: Dummy value
    event.setParam6("Test6");     // String: Dummy value
    event.setParam7("Test7");     // String: Dummy value
    event.setParam8("Test8");     // String: Dummy value
    event.setParam9("Test9");     // String: Dummy value
    event.setParam10("Test10");   // String: Dummy value

    // Custom key-value pairs for flexible data
    // Note: The Cordova SDK's TrackierEvent class has a `setEventValue` method, but it expects string values
    event.setEventValue("signup_time", "1631234567890"); // String: Timestamp (converted to string)
    event.setEventValue("device", "Cordova");            // String: Device type

    // Set user details in Trackier SDK
    await this.trackierCordovaPlugin.setUserId("USER123");              // String: User ID
    await this.trackierCordovaPlugin.setUserEmail("user@example.com");  // String: User email
    await this.trackierCordovaPlugin.setUserName("Jane Doe");           // String: User name
    await this.trackierCordovaPlugin.setUserPhone("+1234567890");       // String: User phone
    await this.trackierCordovaPlugin.setDOB("1990-01-01");             // String: Date of birth (YYYY-MM-DD)
    await this.trackierCordovaPlugin.setGender("Male");                 // String: Gender (Male, Female, or Others)

    // Additional user details
    // Note: Cordova SDK does not have a direct method for additional user details like other SDKs
    // You can pass additional data as custom event parameters or handle it via your app logic

    const userDetails: Record<string, string> = {
     Plan: "FREE_PLAN",
     SignupMethod: "Email",
     AppVersion: "1.0.0"
    };

    Object.keys(userDetails).forEach(key => {
      event.setEventValue(key, userDetails[key]); // Add user details as event values
    });

    // Send the event to AppTrove
    this.trackierCordovaPlugin.trackEvent(event);
  }
}
4. Revenue Event Tracking
Revenue events allow tracking of in-app revenue, including amount and currency, to monitor monetization performance.
Steps to Track Revenue Events
- Create an event object (
AppTroveEvent/TrackierEvent) with the event ID. - Set the
revenueandcurrencyproperties. - Call
trackierCordovaPlugin.trackEventto track the revenue event.
JavaScript Example (Ionic Native)
- ✓ Apptrove SDK (Recommended)
- Trackier SDK (Deprecating August 2026)
import { Component } from '@angular/core';
import { AppTroveCordovaPlugin, AppTroveConfig, AppTroveEnvironment, AppTroveEvent } from 'com.apptrove.cordova_sdk/ionic-native/apptrove/ngx';

@Component({
  selector: 'app-tab3',
  templateUrl: 'tab3.page.html',
  styleUrls: ['tab3.page.scss']
})
export class Tab3Page {
  constructor(private apptroveCordovaPlugin: AppTroveCordovaPlugin) {}

  async ngOnInit() {
    // Initialize SDK
    var key = "0455721b-XXXX-XXXXX-596d818d910a";
    var appTroveConfig = new AppTroveConfig(key, AppTroveEnvironment.Development);
    this.apptroveCordovaPlugin.initializeSDK(appTroveConfig);

    // Track Revenue Event
    var appTroveEvent = new AppTroveEvent("1CFfUn3xEY"); // Event ID
    appTroveEvent.setParam1("Param 1");
    appTroveEvent.setParam2("Param 2");
    appTroveEvent.setParam3("Param 3");
    appTroveEvent.setParam4("Param 4");
    appTroveEvent.setParam5("Param 5");
    appTroveEvent.setCouponCode("TestCode");
    appTroveEvent.setRevenue(10.0); // Revenue amount
    appTroveEvent.setCurrency("INR"); // Currency code
    this.apptroveCordovaPlugin.trackEvent(appTroveEvent);
  }
}
import { Component } from '@angular/core';
import { TrackierCordovaPlugin, TrackierConfig, TrackierEnvironment, TrackierEvent } from '@awesome-cordova-plugins/trackier/ngx';

@Component({
  selector: 'app-tab3',
  templateUrl: 'tab3.page.html',
  styleUrls: ['tab3.page.scss']
})
export class Tab3Page {
  constructor(private trackierCordovaPlugin: TrackierCordovaPlugin) {}

  async ngOnInit() {
    // Initialize SDK
    var key = "0455721b-XXXX-XXXXX-596d818d910a";
    var trackierConfig = new TrackierConfig(key, TrackierEnvironment.Development);
    this.trackierCordovaPlugin.initializeSDK(trackierConfig);

    // Track Revenue Event
    var trackierEvent = new TrackierEvent("1CFfUn3xEY"); // Event ID
    trackierEvent.setParam1("Param 1");
    trackierEvent.setParam2("Param 2");
    trackierEvent.setParam3("Param 3");
    trackierEvent.setParam4("Param 4");
    trackierEvent.setParam5("Param 5");
    trackierEvent.setCouponCode("TestCode");
    trackierEvent.setRevenue(10.0); // Revenue amount
    trackierEvent.setCurrency("INR"); // Currency code
    this.trackierCordovaPlugin.trackEvent(trackierEvent);
  }
}
5. Passing User Data to SDK
Passing user data (e.g., user ID, email, name, phone, DOB, gender) enhances analytics by correlating events with user profiles.
Steps to Pass User Data
- Create an event object (
AppTroveEvent/TrackierEvent) with the event ID. - Use
trackierCordovaPluginmethods to set user data (e.g.,setUserId,setUserEmail). - Track the event with associated user data.
JavaScript Example (Ionic Native)
- ✓ Apptrove SDK (Recommended)
- Trackier SDK (Deprecating August 2026)
import { Component } from '@angular/core';
import { AppTroveCordovaPlugin, AppTroveConfig, AppTroveEnvironment, AppTroveEvent } from 'com.apptrove.cordova_sdk/ionic-native/apptrove/ngx';

@Component({
  selector: 'app-tab2',
  templateUrl: 'tab2.page.html',
  styleUrls: ['tab2.page.scss']
})
export class Tab2Page {
  constructor(private apptroveCordovaPlugin: AppTroveCordovaPlugin) {}

  async ngOnInit() {
    // Initialize SDK
    var key = "0455721b-XXXX-XXXXX-596d818d910a";
    var appTroveConfig = new AppTroveConfig(key, AppTroveEnvironment.Development);
    this.apptroveCordovaPlugin.initializeSDK(appTroveConfig);

    // Track Event with User Data
    var appTroveEvent = new AppTroveEvent("1CFfUn3xEY");
    appTroveEvent.setCouponCode("TestCode");
    this.apptroveCordovaPlugin.setUserId("TestUserId");
    this.apptroveCordovaPlugin.setUserName("testName");
    this.apptroveCordovaPlugin.setUserPhone("XXXXXXX");
    this.apptroveCordovaPlugin.setUserEmail("sanu@gmail.com");
    this.apptroveCordovaPlugin.setDOB("1990-01-01"); // YYYY-MM-DD
    this.apptroveCordovaPlugin.setGender("Male");
    this.apptroveCordovaPlugin.trackEvent(appTroveEvent);
  }
}
import { Component } from '@angular/core';
import { TrackierCordovaPlugin, TrackierConfig, TrackierEnvironment, TrackierEvent } from '@awesome-cordova-plugins/trackier/ngx';

@Component({
  selector: 'app-tab2',
  templateUrl: 'tab2.page.html',
  styleUrls: ['tab2.page.scss']
})
export class Tab2Page {
  constructor(private trackierCordovaPlugin: TrackierCordovaPlugin) {}

  async ngOnInit() {
    // Initialize SDK
    var key = "0455721b-XXXX-XXXXX-596d818d910a";
    var trackierConfig = new TrackierConfig(key, TrackierEnvironment.Development);
    this.trackierCordovaPlugin.initializeSDK(trackierConfig);

    // Track Event with User Data
    var trackierEvent = new TrackierEvent("1CFfUn3xEY");
    trackierEvent.setCouponCode("TestCode");
    this.trackierCordovaPlugin.setUserId("TestUserId");
    this.trackierCordovaPlugin.setUserName("testName");
    this.trackierCordovaPlugin.setUserPhone("XXXXXXX");
    this.trackierCordovaPlugin.setUserEmail("sanu@gmail.com");
    this.trackierCordovaPlugin.setDOB("1990-01-01"); // YYYY-MM-DD
    this.trackierCordovaPlugin.setGender("Male");
    this.trackierCordovaPlugin.trackEvent(trackierEvent);
  }
}
Best Practices
- Validate Event IDs: Ensure event IDs are correctly copied from the Apptrove Panel to avoid tracking errors.
- Use Descriptive Parameters: Set meaningful values for
param1toparam10,couponCode, and user data to facilitate analytics. - Test in Development Mode: Use a development/testing environment (Apptrove:
AppTroveEnvironment.*, Trackier legacy:TrackierEnvironment.*) during testing to verify event tracking without affecting production data. - Limit Event Frequency: Avoid excessive event tracking; prioritize key user actions.
- Log Events for Debugging: Use
console.logto confirm events are triggered and sent correctly during development. - Comply with Privacy Regulations: Ensure event and user data comply with GDPR, CCPA, and other privacy laws, obtaining user consent where required.
Troubleshooting
- Events Not Appearing in Dashboard:
- Verify the event ID matches the one in the Apptrove Panel.
- Ensure the SDK is initialized before tracking events.
- Check that the environment (
Development,Production, orTesting) matches the dashboard settings.
- User Data Not Tracked:
- Confirm user data methods (e.g.,
setUserId,setUserEmail) are called beforetrackEvent. - Check for syntax errors in user data values.
- Confirm user data methods (e.g.,
- Revenue Tracking Issues:
- Verify
revenueandcurrencyvalues are correctly set and use supported currency codes (e.g.,"INR","USD").
- Verify
- General Issues:
- Check console logs for errors related to
trackEvent. - Ensure the correct provider (
AppTroveCordovaPlugin/TrackierCordovaPlugin) is registered inapp.module.tsfor Ionic Native apps.
- Check console logs for errors related to
For further assistance, refer to the Apptrove Documentation Portal or contact Apptrove support at support@apptrove.com.